TURN YOUR VAN INTO A CAMPER!
(August, 2025, 14 years later, I still say,) You can do it!
I started this conversation in 2011 to explain a simple way to convert a van into a camper. It's been seen by hundreds of people daily, more than 400,000 so far. Some send photos of their conversions and I tack them on.

To bad I can't wipe the inside of my lungs.
 |
| We had to rent a gypsy wagon to get a campsite in North Georgia |
2024- Here's wishing you another endless summer of grand van adventures. This summer ('24) we're exploring the coast of Northern California. A year ago we took "The Goose" north to Virginia's Shenandoah Valley. She LOVED being on the road again.
Our last big trip was a 12,000-mile journey in 2018 in our "new" converted van. We've done a lot of weekend trips since then. The Golden Goose carried us up into the Smokey Mountains in 2022.
She headed to her new home in Santa Cruz, California last August. My son, Ian, is attending the university there. The Goose took him, his bikes, and guitars across the country. Now we are borrowing her for a month.

_______

This Golden One, second conversion, is a 2012 Sienna. I posted details of this undertaking my blog
http://thegroveguy.blogspot.com (Its my 5-28-18 blog). Here's a specific link, paste it in if clicking on it doesn't work.
https://www.blogger.com/blogger.g?blogID=5428534988922325676#template/postNum=6
From Gainesville, Florida,
Glenn Terry,
Questions? mangoglenn@yahoo.com
Here we are on 2021's Summer Adventure, camping in Cataloochee Valley in the NE part of Smokey Mountain National Park. We love it here and so do the elk!

Now back to my 2011 conversion blog,
___________________________________________________

June, 2011
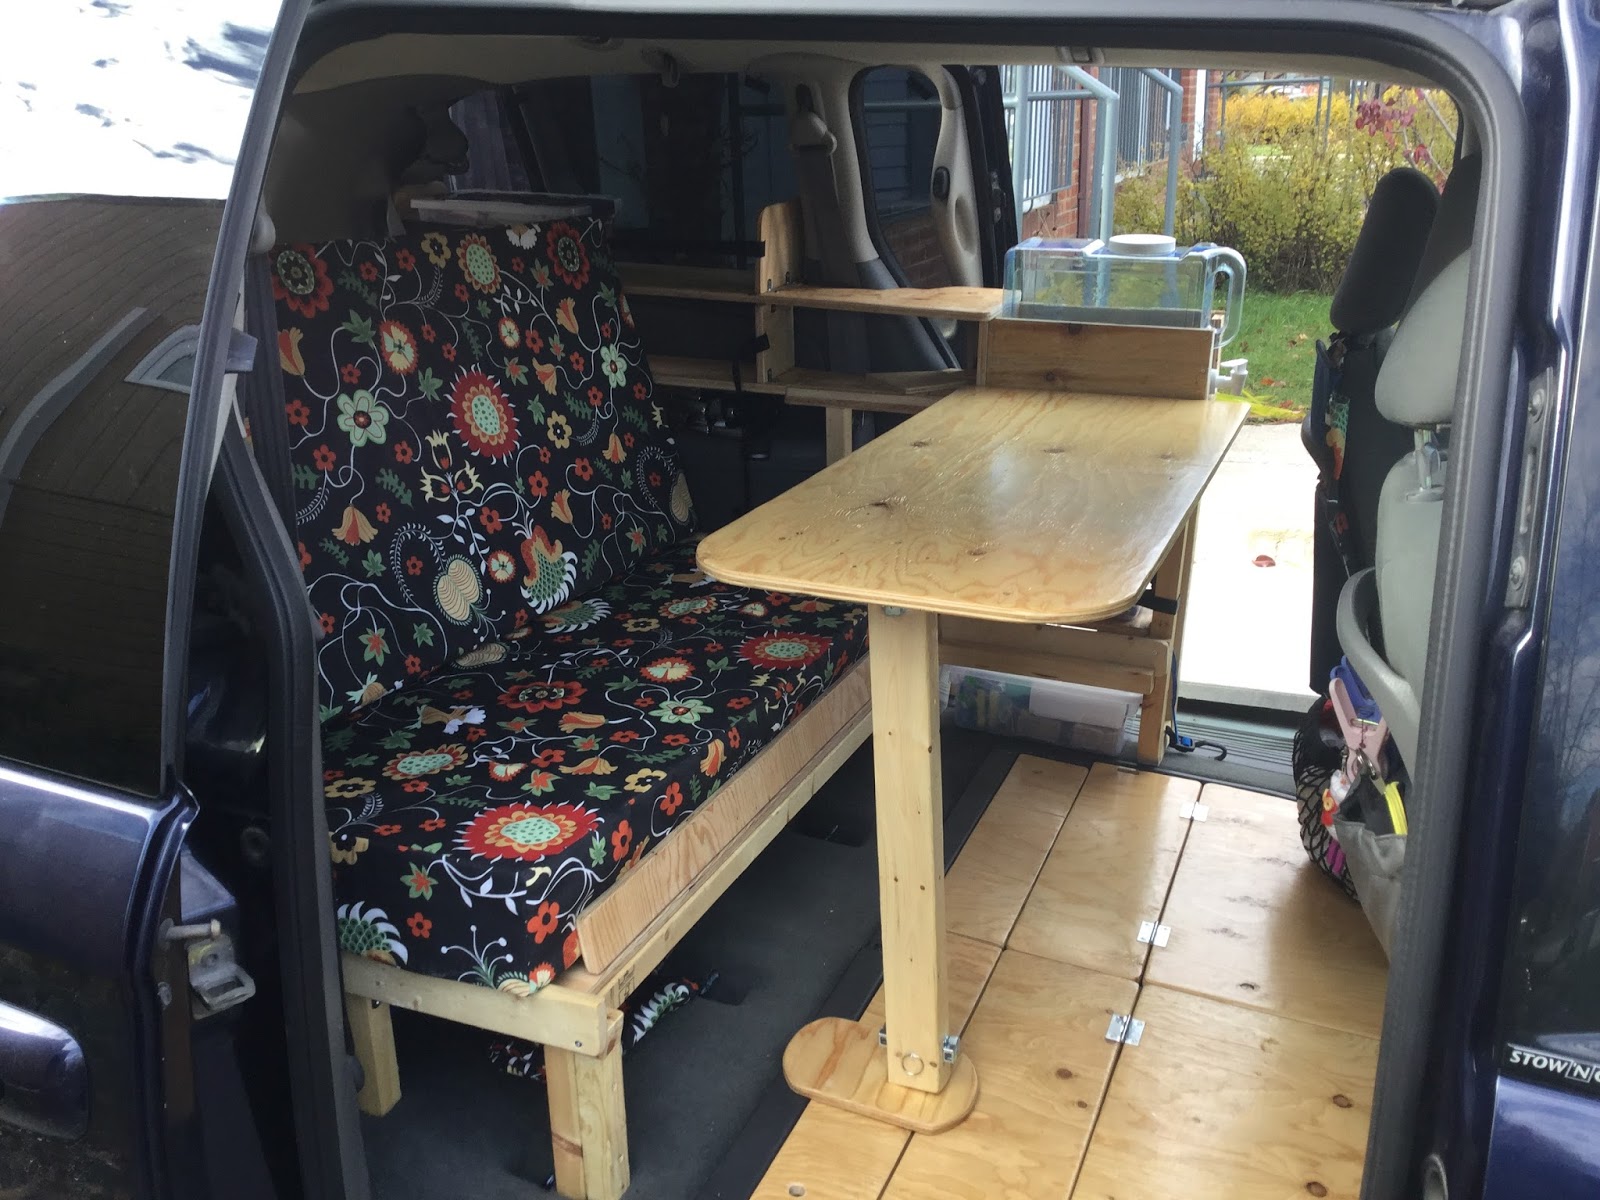
We loved our old VW camper but the darn thing kept breaking down. Last month we replaced it with a 2004 Toyota Sienna van. At first it looked like the dozens you see on the road. Then, we tossed the back seats and replaced them with a simple bed frame.


Next, I covered the frame with plywood on hinges. There are four parts and each end lifts up to give access to the storage areas below. On the port side I built shelves and a cooking area.


At his point a small brown dog discovered our mini-camper and took up residence.
Francesca made curtains and our friend,
 Gina, helped us with cushions that allow us, to have either a back seat or a bed.
A table pops up for fine dining and the blue box to the right keeps the wine chilled.
We did this for $200*. A California company (www.gtrv.com) can to the same thing [including a pop-top] for $20,000. There's another website (http://www.myminicamper.com/) than offers instructions on how to do cheap minivan conversions.
*Yes, I bought the mattress at the Goodwill store ($30), cut it down to size and it worked out great.
ONE FINAL TOUCH
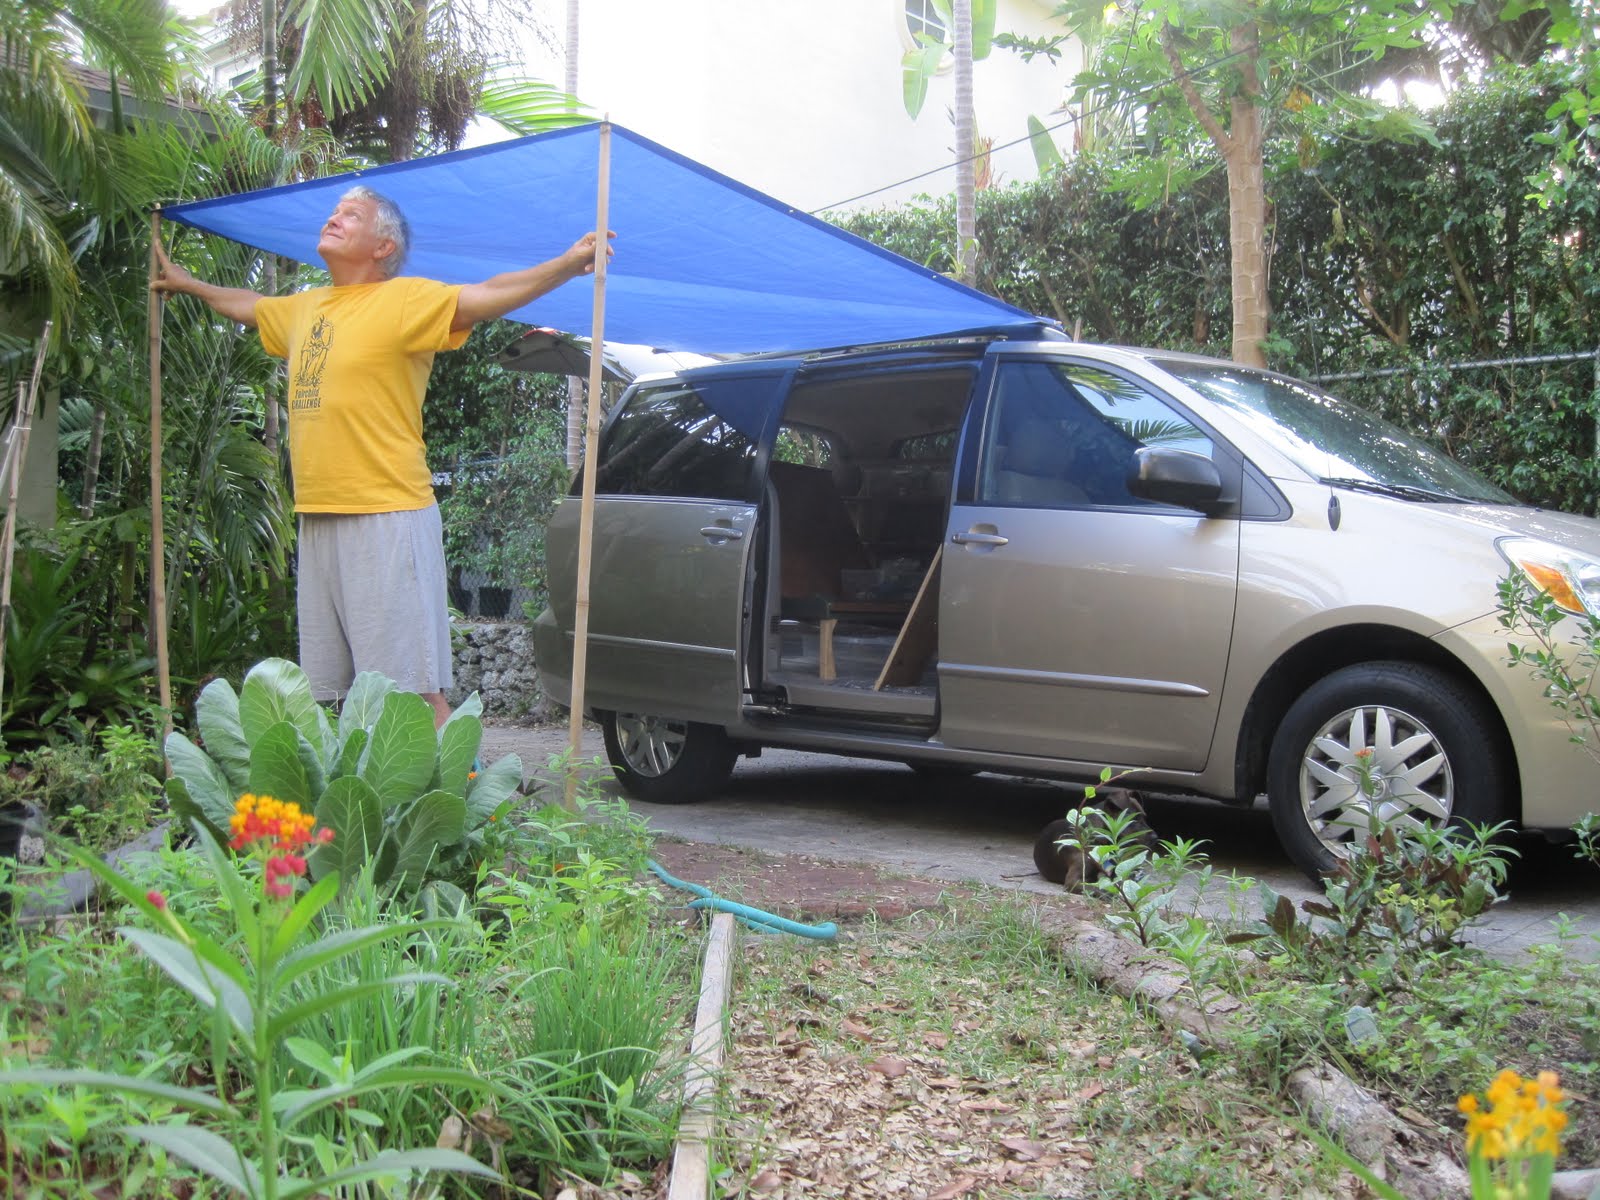
A little tarp and two bamboo sticks gave us a front porch.
(May, '14 note. The 6x8 tarp is okay for shade but not the best in the rain. We're upgrading to 8x10')
Today's the Big Day. Francesca, Pi, and I are going to jump in our rolling home and head for Chicago. After that we'll go west on the Oregon Trail.
We'll probably stop at every place that allows dogs. Stay tuned for details.
Postscript, December, 2011
Our Big Trip: 49 days, 29 camping nights (we stayed with friends a lot) , and 14,000 miles in the last six months, we have no regrets.
We drove almost 11,000 miles around the U.S. last summer with no significant problems.
Our design works well and seems just right for us. If you have a question write to bettermiami1@yahoo.com and I'll try to help you.
Glenn
VAN CONVERSION Part II , August, 2012


Removing them for the bed conversion is a breeze. When not in use we keep them in the beverage holder a few inches away.


The removed upper seat belt holes make a fine place for a supportive bolt. A string loops on the "door" (each side)and hold it open when you want access to the back.


Update-April 17, 2013
Our van's been chillin' for the last year, just occasion trips around the Sunshine State. In June we'll take it on another big adventure, north to Canada. We see no need to change anything.
What we created 22 months ago still works fine.
Update, August 22, 2013
We're back from our 7000 mile trip to Canada. It was great (and well-covered in this blog).
We still can't think of anything significant we'd change in our van.
I may build another one just for fun (and sell the '04 that we now have).
I am being encouraged to write some sort of van conversion book.
I may do that when things slow down.
 On the road, somewhere in Northern Michigan
Update, Nov. 19, 2013
Brian wrote asking "with mini-vans having uneven floors, how do you figure out how long each bed leg should be to have a level bed surface?" I replied,
Brian,
Actually, all of the mini-vans' floors are uneven. What you do is to park you van in a level place. Then, you decide where you want your bed to be (like, 1 foot above the floor). Here are two methods to figure out how long the bed legs should be.
A) Get a level and mark the inside wall making a level line with pieces of tape. This is where you'd want your bed to "touch" the inside wall. Then you measure how long the legs have to be to reach the floor.
B) Another way is to build a simple frame for your bed, say, 6' x 4' with four cross pieces (I used 2x2 pine). Place this inside your van where you want your bed to be, on top of boxes or milk crates. Get it level using shims or whatever. Now you can actually measure how long each leg needs to be in the place that it will touch the floor.
Voila!
Glenn
Update, April 24, 2014
Hi Gang,
The van's in the driveway begging for the next adventure. No solid plans yet but Bill S. just wrote to ask, "What do you do when it gets too hot to camp? I responded,
Hi Bill,
I'm glad you enjoyed my blog and the Sienna conversion post. I
STAYING COOL
How do we stay cool while camping in the summer?
First, we bought a van with an AC that works great (unlike the VW's).
Second, we try to go where it is cool in the summer (The west coast and any mountains, work fine). We might camp on the ocean were there is a breeze and we also carry bring "our own breeze". We have a plug-in fan and one that runs on batteries (30 hours on four batteries!).
Obviously, making screens that keep bugs out is important as well (covered up above somewhere). Also, you make shade with
tarps suspended from your van (also above) or from nearby trees.
If you camp you see people creating portable carports with very large tarps tied to trees, protection from both rain and sun.
In west Texas three years ago we attempted to camp in 106 degree weather. I told my wife, "It'll cool off after sunset" and after the sun set, the thermometer climbed to 107.
We got a motel that night. How we snuck the dog in is another story.
I see that some create van "air conditioners" with ice-filled coolers and 12v fans (see 'em on You tube). Whatever works for you...or, you could plug in the real thing.
I once ran into a guy camping in the summer heat of the Florida Keys (not as bad as Texas) who carried a small AC on the floor of his van. When it got too hot he hung it in the right front window, plugged it in and had instant cool!
How cool is that?
I hope you find this information helpful.
In Coconut Grove where it's starting to get warm again (we're making plans to leave for the summer),
The Grove guy,
Glenn
PS: A couple of reminders,
-If you have a question you can write to me (the info is somewhere above but it's getting crowded up there). My e-address is bettermiami1@yahoo.com. I am Glenn Terry and my wife and I live in Coconut Grove, Florida.
YOUR COMMENTS- It is hard for people to "comment" on this blog. Apparently they make you sign up to do it. It you do wrote a comment please do not ask me a question. I am unable to respond to comment questions and hey, I can't see your e-address either.
-I blog about all kinds of things at www.thegroveguy.blogspot.com. Of my 600+ entries, the one about converting the van gets the most hits (260,000+ as of 9-17)
- I am an artist and recently started my own "country", The Mango Republic. Its a great place and you can be a citizen for free. The ruler ("King Mango") is gracious, benevolent and tells good jokes.
You can buy cool Mango Republic t-shirts by seeing the Facebook page, or dropping me a line, www.bettermiami1@yahoo.com and I'll send you the one-page "catalog". They're perfect for camping.
__________________
Welcome to the site, Dave. It's gotten over 260,000 hits since I put it together six years ago. I know it lacks specifics but I haven't had time to add a lot of dimensions, drawings, more photos or so forth. I think its pretty good the way it is.
I'm going to add an introductory video one of these days.
Congratulations on getting through nursing school. I squeaked through law school many decades ago. Twenty years later, I left lawyering to become an art teacher. Best thing I ever did.
There are too many lawyers and I did my part to correct that problem.
THE BASICS OF BUILDING A CAMPER...
The Quick Version
You start converting your van tossing out the back seats. Then, you measure the area you have to work with (things like, "How far do I want the driver's seat to slide back or recline?" become important...) Then, it's how big to I want the bed to be? (Ours is a little narrower than a full ("double") bed) Make it an inch longer than the tallest person sleeping in it. Then, you build the shelves and stuff around that.
Now build it!

WHAT WOULD YOU DO DIFFERENTLY?
Its odd but there is very little I would do differently if I were building the camper now. I would make the two struts that hold up the couch back stronger (thicker/stronger wood or maybe metal) because they cracked a bit and had to be repaired en route (no big deal).
We're just happy with our set up. It's simple. I even made a tiny fold-up toilet which also can be a stool or garbage can.
Your planned route for the summer sounds great. Did you see the one we took? If not , look at the blog entries from the summer of 2011 (beginning at the end of June, 2014. It is similar to the one you are planning). It starts right after the conversion piece.
(Response to a question on 5-18-14)
Glenn and Francesca
_________________
THE RONSMANS ON THE ROAD
JULY 1, 2014 We heard from the Dave and Meg Ronsman, a couple currently touring the west in their converted Honda minivan. Here's a note from them plus info on their blog and a short, descriptive video (go to the end, the first entry on their blog, "June, 2014") for the "how we did it" part.
July 10, 2014
I read that the Ronsmans (above) had begun their journey by driving from Wisconsin to San Francisco. My wife and I are visiting the Bay Area too so we invited them to come see us in Berkeley.
 It was so exciting to see them drive up in the '06 Odyssey, tricked out much like the one I built in this blog. They've done a few things differently, like putting a plug-in cooler in "the basement".
 Dave is a happy camper

They're a wonderful couple and we gave them the Berkeley tour.
 Here we are in hills looking towards the San Francisco bay and the Golden gate bridge.
___________
EXTRA ELECTRIC
DROZENS BACK FROM THEIR 2000 MILE ADVENTURE
Ninh Drozen wrote to me last summer for a few tips on his Sienna conversion and I was happy to comply (see above).
Last month he and his wife completed their first adventure, a long awaited trip from the Bay Area to Seattle in their camper.

Here are his thoughts about his project.
_________________________________________________
2-19-15 Last month we took the van to North Florida to explore our state's "Forgotten Coast". We swam with manatees and camped on a windswept island. You can read about it in my January/February '15 blogs.
Terri M. , from Sebastian, Fla., wrote today about converting her '09 Sienna. Here's my reply:
4-13-15 BED DIMENSIONS
Today I went our to visit our camper in the driveway with camera, note pad, and measuring tape in hand.
A new friend, Hugh Andrews, wrote to ask, "I just bought an '05 Sienna and am ready to convert it. Could you measure the bed top for me?".
I did this, described the building process (with photos) and sent them along to Hugh. Now you can see them too.
Glenn,
The Grove Guy
( I live in Coconut Grove)
To: Hugh Andrews
Hello Hugh.
Congratulations on your purchase. You're going to have great adventures in your converted van. Looking elsewhere on the Grove Guy blog, you can see that since 1911, we've taken our van all over the place.
Here are some suggestions and the measurements you asked for to help you build the top of the bed.
Use good quality plywood, just thick enough (I used 5/8") to keep it strong but light. One 4"x8' piece of plywood will do. I had the lumber yard cut it as their saws make these long cuts clean and easy (and are well worth paying the cutting fee).
Again, I made my bed as long as I am tall, 6'1". Our bed is 45" wide. Note: In May, 2018, I built a second bed that is 50" wide. That's as wide as you can go with a 2011=2018 Sienna. My wife wanted more room.
Then you make horizontal cuts of 30", 5", 17", and 21".
Here's how they break down. Imagine you are looking into the van from the back. You've already built the bed frame from 2x2 pine.
Below you see the inside of the bed from the back with the four pieces of plywood marked. In this position Piece #3 is ready to fold up to put the seat back in position.

Here is the same thing seen from the front right side. (yes, it is blurry but what the heck. That's piece #4 on the bottom with piece #3 on top of it, ready to fold up on its hinges to create the seat back.

 1) As you look into the van from the back, just in front of you is the foot (bottom) of the bed. this is where the 30"x45" piece goes. It will be fastened by two hinges to piece #2 and it will be the door that you lift up (see photo to the left) to reveal the "basement" storage area.
2) The second piece, the 5" strip, is glued and screwed to the frame above piece #1. This adds strength to the bed frame and it makes it more rigid. It is the only
piece of the bed top that does not move.
 Detail of right side corner where #1 and #2 attach in flat bed configuration. #2 does not attach to #3 as #3 has to be free to "swing up" to form the seat back.
3) The third piece, 17"x45" plywood, will be the back of the seat that the bed converts to. It has a piece of 2x2 attached to the bottom (where it meets #2) to give it strength and allow a good place to attach the struts that hold it up in the seat position. It is attached to #4 with three hinges (you can see them here).
4) The fourth piece is 21"x45" and it is the "head of the bed" and bottom of the seat. It moves forward when converting the seat into a bed. It has Two 2x2 on the bottom to add strength to the plywood and to prevent it from sliding forward when in seating position. The "south'' one goes next to the hinges.
You add these four length numbers and they come up to 73". Amazing, 6'1", just like I had planned.
 Here is what the top of the bed looks like, from the front right side, when all of the piece lie flat for the bed configuration. #3 & #4 are attached by three hinges. The middle one is a brass piano hinge (but most any thin hinges will do).
 That's about it.
 Good luck on your project. Glenn
I added this photo for its entertainment value. I got hit in the head by a falling papaya last week. Hopefully, it will knock some sense into me.
Hugh Andrews just finished his camper and is on his first mini-camper adventure (New River Gorge, WV) How exciting.
He built his so he can easily put the seats back in when camping season ends. The bed is wider than ours (my wife loves this. "I'd like that room to stretch out", says she. What a craftsman, that Hugh. Check out the pictures he sent along:

He built the frame in his garage. Below is the finished product.The "side table" probably bolts to the frame above. The right side of it holds the front left side of the bed.


 This is Hugh's "strut set" (with custom pockets to store them), the arms that hold the bench back upright. I chose to attach mine permanently to the bed frame (they fold down when not in use).
And now, back to serious business,
Mr. Andrews is raising the coolness level of his van to new heights. In the photo you can see his new tent extension that mounts over the raised back door ( a DAC Explorer 2, about $140) and and ARB 2500 awning (around $300). He also considered a Tail Vail (trailvail.com) which is a similar rear tent that extends to the ground.

These should keep the sun and bugs out....and speaking of bugs,
TERMITE ATTACK
We were recently surprised to see evidence of termites feasting on our van's interior woodwork.
 These piles of poop (and the bugs that were making them) had to go. We tried spraying termite poison in their tiny entrances and we gassed the van with a bug bomb.
 We think these didn't kill the eggs because they were back in weeks.
Extreme temperatures kill these critters too. It never snows in Miami but it sure gets hot. We learned that termites die when the temperature gets to 140 degrees for an hour. So, here's shat we did...

We put a meat thermometer in the window and a heater (and a big thermometer) on the floor. We parked the van in the Miami mid-day summer sun.
It took two hours for the van's interior to reach 140. An hour later we unplugged the heater and let our sweltering camper cool down.
When opened her up there were about 40 winged termites dead on the floor. We could not detect any heat damage to our van.
We swept up the bugs and dumped them in our pond. The gold fish love baked termites!
_______________

Lobster tails on the grill. Camping on the ocean in the Florida Keys
_______________
A friend sent me a video of someone who has converted a Sprint work van into something like a lush yoga temple,
http://tinyhousefor.us/rvs-trailers/incredible-diy-motorhome/
We kept our project simple and let the wilderness surrounding our van be our "temple".
_____________________
We spent this summer exploring three European countries. We counted the (mostly uncomfortable) beds we slept in (twelve). We concluded is that one of the coolest things about traveling in a van is that you have the same bed to come home to every night.
If you want come on this adventure join up at www.thegroveguy.blogspot.com.
 In van building news, Mark of Alaska sent me photos of a very simple van conversion project. It's a box with a front flap that rests on the folded middle seats. A friend of his built this for $70. It doesn't have a couch that converts to a bed or much storage.


_______________
8-15-15
 Last week my wife and I visited one of the sacred places for all who love, or have loved ( and probably suffered with), Volkswagen campers.
 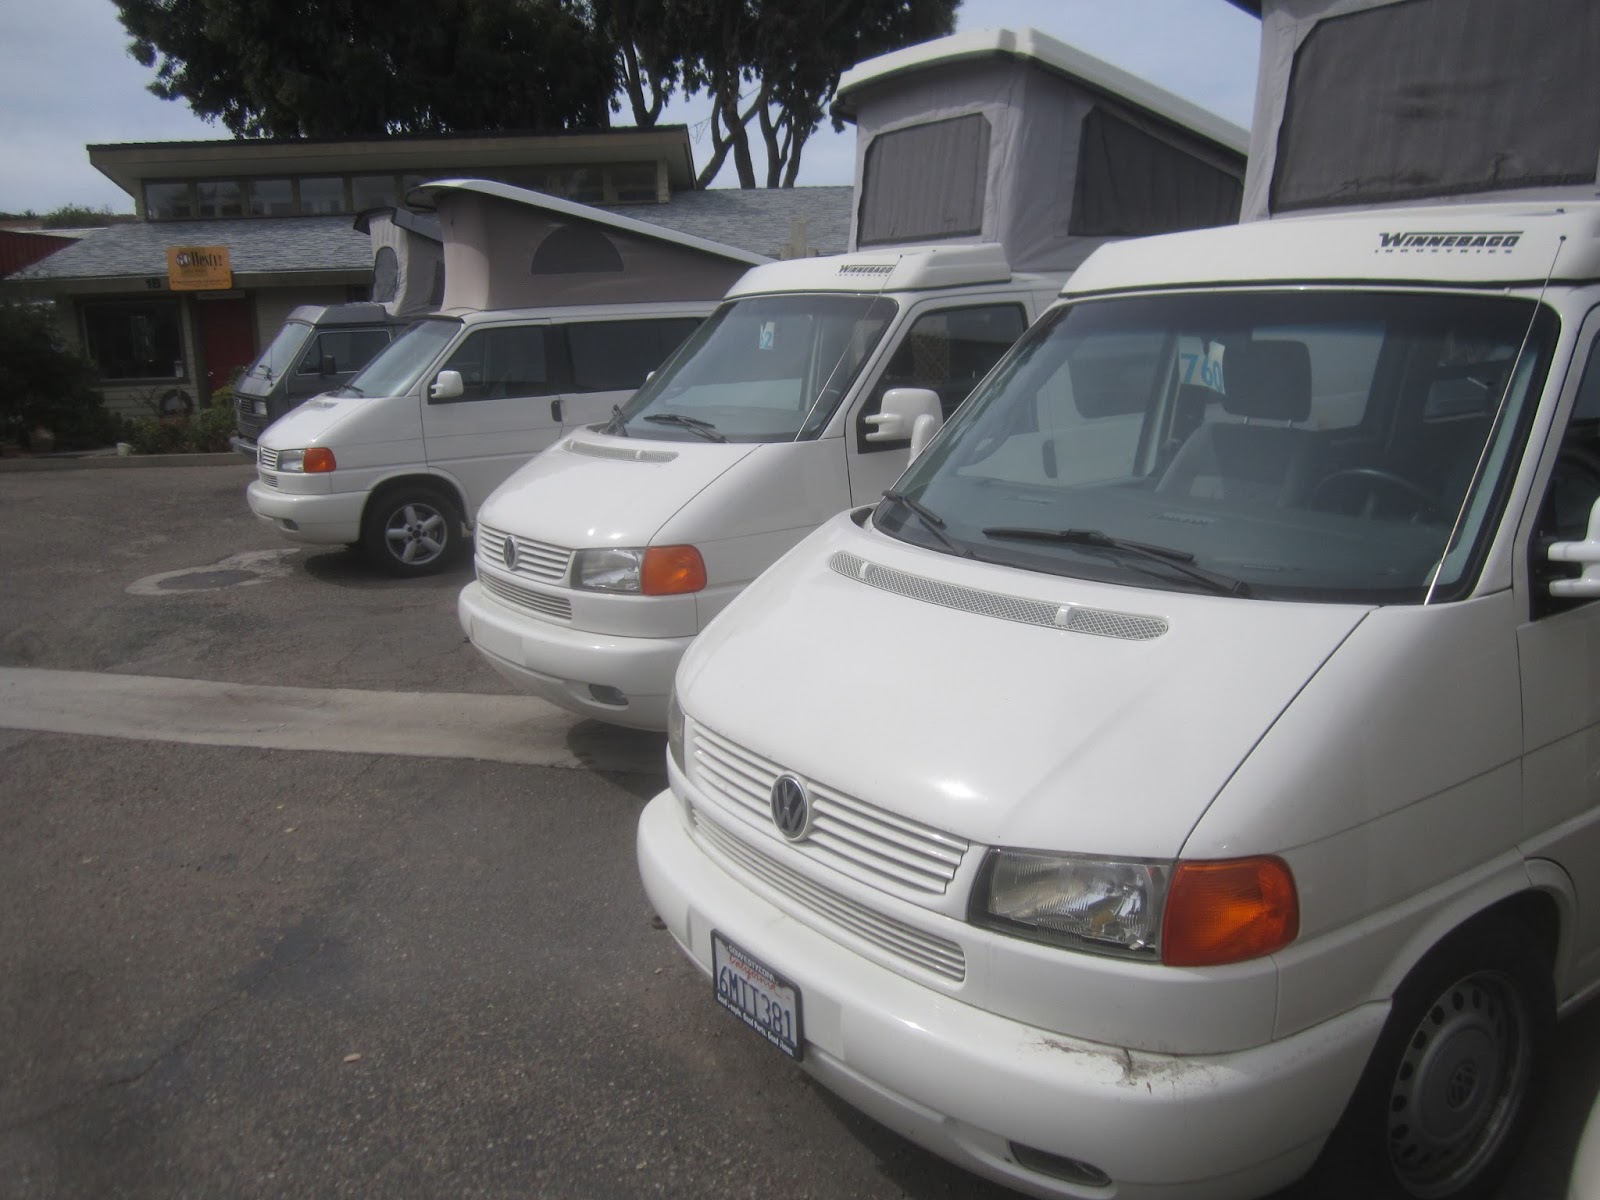 "GoWesty" is a thriving business on the central California coast (Los Ossos) that takes 86' to 03' VW vans and makes them like new. Their mechanics go from bumper to bumper replacing every worn part. They're not cheap. Prices range from $30,000 to $70,000.
Note: "Westy" is the affectionate name for VW Westfalia camper vans.
Their vans are for those who have dreamed of owning a VW camper and who can afford the best. That's not me but,
 check 'em out at www.gowesty.com .
 We used to own (and often repair) one like this, an '87 VW Westfalia camper.
In Europe, California, and Hawaii you can rent them.
My brother-in-law and his family are now living in one for a week as they explore Yosemite National Park.
_________________________________
9-30-15
I had to laugh at this cartoon in last Sunday's paper. It captured the troubles we had with our '87 VW camper.

OFF TO THE FLORIDA KEYS (10-12-15)
Our van spent months in the South Florida heat this summer (we were looking for cool weather in Europe). We dusted it off last weekend and headed for a spot in the Keys.

You can camp just ten feet from the Great Atlantic and Havana is just over the horizon.
More on my 10-12-15 blog, "30 Feet of Beachfront, $40".
*******
Nov. 3, 2015
This just in from a new friend, "Jim". I'm not sure just what he did with all the drawers sliding here and there but he seems very happy with the results.
Brilliant design! I copied it for my 2007 Sienna. I used an single IKEA pine bed for the base turning the headboard upside down.
I used a 2' drawer slide to slide in for the seat and out for the bed. I used 3/4 ply for the bed hinged like yours. I made the seat back low enough to see out the back windows.
With only a few inches left, I hacked an IKEA small 3 drawer one foot wide x 3 foot chest in to a sink with a large stainless steel bowl, a grey water tank and two small drawers. This is mounted on flat mounted drawer slides I can slide forward with the front passenger seat. there is a folding shelf that folds out the side door for cooking if there is no table.
For privacy I made refletex window covers with black fabric sewed and glued to one side. These have grommets which hold clear plastic suction cups that attach to the glass.
Your design is the best I've seen for a minivan. I'm so inspired! on MINIVAN CONVERSION
(Thanks Jim. Your enthusiasm is contagious!) G
JUNE, 2016
FIVE YEARS LATER WE'RE
HEADING WEST AGAIN!
Here we go, getting ready for another 11,000 mile trip from Miami to Berkeley with many, many stops along the way.
The van's been thoroughly checked out. She's got new tires and a bigger awning. We "spread her wing" today for the first time.

This one is bigger and white (to reflect the sun better). Stay tuned to www.thegroveguy.blogspot.com for more stories from the road!
___________________
July 29, 2016
SECOND CROSSING
 Many people look at this blog to see how we have converted our van into a camper. That's great but what you are reading is just one of 500+ entries in my "The Grove Guy" blog.
If you want to see where we are traveling this summer just go to www.thegroveguy.blogspot.com .
We are now 5000 miles into another cross-country tour of the USA. Except for replacing one set of wheel bearings ($300, Lexington, Va.) our van has been behaving perfectly.

 We met another couple (Larry and Melanie) in Canyonlands NP last week. They had converted their 2001 Sienna as well. Incredibly, it has 281,000 miles on it and they say they've had no serious problems.
 This happy couple retired early. They spend the summers van- camping and their winters on a 46' sailboat in Mexico. Above, Larry giving the thumbs up for his Sienna
I'll tell you about their conversion later. It is more simple than mine.
Wishing happy trails to you this summer,
Glenn & Francesca
www.bettermiami1@yahoo.com
8-2-16, Headline seen this morning:
VANDWELLING IS THE NEW AMERICA DREAM
Maybe we're on to something. Below is a link to an article about folks who live in their vans all the time.

http://www.vice.com/read/living-out-of-your-car-is-the-new-american-dream
________________
9-16-16 Hello van fans. We've been on the road for three months now. Two weeks ago I went to my first Burning Man (the 8-day festival in Nevada's desert)

and after that, the van was thrilled to be visiting Yosemite NP again.
 We're in Hurricane, Utah, at the moment, about to plunge into the wonders of Zion National Park. I'm happy to report that our Toyota camper ("The Amber Rambler") is carrying us everywhere with a smile and no problems. We'll be back in Florida in two weeks.
HOME AGAIN- We made it back to South Florida without any problems. The American southwest is fantastic as ever. If you want to see details they're on the blog in the August/Sept. 2016 section.
______________________________________________
NEW FRIENDS FROM CANADA Dec. '16
Isabelle and Hubert drove down from Quebec in November to
spend a month in Florida. Here are some photos of their Dodge Caravan conversion,


Our Quebec friends are now passing through the American southwest on their 6-month tour. We wish Isabelle and Hubert all the best.
_____________________________________
THE PLYWOOD BED DIMENSIONS
May 1, '17
Joe Timm wrote asking me about the dimensions of each piece of the 1/2" p-wood bed. I covered them earlier in the blog but here they are again:
_______________________________________________
ATTACHING A TARP TO THE OUTSIDE
May 1, '17
Lisa has asked questions about the tarp we attach to the van to protect us from the sun and rain. The little blue (6'x8') one you see at the blog's beginning was okay but a little small. We now carry
two, one for rain and the other (larger for shade). Here's my response:
 The easiest poles to obtain are 2x2 pine (actually 1 1/2" sq. on end). Round 1 1/2" wood poles (curtain rod mat'l) look
 into each end (with tough epoxy) to make the ends stronger.
 through
the grommet holes. There are two poles, one at each corner. Mine are 6'6" tall. The
poles are a little shorter that the roof rack pole's height
through
the grommet holes. There are two poles, one at each corner. Mine are 6'6" tall. The
poles are a little shorter that the roof rack pole's heightTWO SHOTS: CAMPING IN THE FLORIDA KEYS


SPRING CLEANING 2017
Every couple of years we take everything out. We clean, vacuum, and throw out things never used. People sometimes ask for more explanatory photos. Okay, here's what parts of the van's interior look like "bare" six years after the conversion:


store below the couch. The two plastic boxes pull out like drawers when it is covered.


gear that pulls out both inside or outside.
_____________________________
July 29, 2017
I'm spending the summer in California. There is no shortage of cool campers here. Here's one I saw in Santa Cruz recently,

In other news,
I just got a note from Trina L. asking, "How can I put a simple toilet in my van? I don't have much room and I don't want to go the
5-gallon bucket route".
My solution is something like a bucket that folds up. I replied to her,
Hi Trina,
_______________
Feb. '17
(Response to questions about the plywood bed sections)
June, 2018 NOTE: See all your question answered in detail (and photos) by going to my June, 2018 blog "Chapter Two")
________________
the rig that was right for them.
Dear Glenn,
I just finished my second Sienna Conversion. It took two weeks and a good bit of woodwork. I spent $120 on materials and about the same on the cushions for the mattress and couch. See the whole, detailed process by going to my late May, '18 entry.
Here are some photos from my latest creation. It's a lot like the first one 'cept the van is newer and the bed, 5" wider.


Now we need to put in the cushions load 'er up for the next adventure. We begin a 10,000 mile cross-country trip next week. We're excited!
________________________
Sept. 10, 2018
Hey, We're still excited. We just drove our van from Miami to Canada and down to California. 8,000 miles of fun and everything worked perfectly.
 I took it to Burning Man in the Nevada desert two weeks ago and it kept the dust storms at bay.
 With our bikes on the back


In two weeks we'll take the long road back to Florida. I'm happy to report that everything has gone so well on this trip. Our camper van has been the perfect way to enjoy a long summer on the road.

The size of a notebook, you can take anywhere that nature calls. Think of it as a bathroom you can keep in your backpack.
This project began with a common campsite accoutrement, the simple folding step stool.

Staring at mine two summers ago I realized I could turn it into a toilet, a skinny-mini porto-potti.
My wife and I were camping in SE Arizona with no one around.
Francesca took the dog for a walk
 |
while I tried out my tiny toilet.

I was in one of the most open, beautiful places on Earth but the
darn thing could have worked in the privacy of our camper van as well.

My portable privy started out as a twelve-dollar step stool. I realized if you flipped it over and added a plastic bag it became a nifty trash can.


Pondering further possibilities, I thought, "In a pinch I could sit on this thing and relieve myself!".


Yes, it's better suited for a six-year-old but in a pinch, in The Great American Desert, it worked for me.

Psst: It's really small but serves it purpose when needed. Most times we use the loo in campground bathrooms, or, when rolling, rest stops and fast food joints.
_______________________________

I would like to thank this project's chief photographer, Francesca, for taking on this assignment.
 This could be the world's most spectacular camping spot.
Nice job on the van! Now I see why you didn't answer my VW query. Oregon Country Fair?
ReplyDeleteNice awning! I would love to do a conversion on my fiat scudo van sometime, looks like fun!
ReplyDeleteWow... this is exactly what I'm wanting to do but could not get the ideas from head to van. Would you be willing to share more info about your bed design please.
ReplyDeleteSteve,
DeleteI'll tell you anything you need to know.
We're here to help each other, right?
G
Glenn: I own a 2001 Toyota Sienna with 210,000 miles and it still runs well, is watertight and dependable. Great car, and I'm glad your comments are giving the model its due. I have a couple questions about your layout: 1) Have you published a schematic of your bed/shelves/storage/table yet? 2) is the bed frame a standard "twin" size? 3) when bed is in the "seat" position, is the rear "storage basement" open to view? 4) are you aware of any mobile wi-fi equipment available to use my laptop while parked? ---Bryan O
DeleteLike the shelves at the rear window..
ReplyDeleteI keep looking for a screened window solution.
I currently use the eaves trough leaf guards (white plastic with screen) available at Home Depot that fit in the side windows of the sliding doors. My wife and I travel extensively in our Sienna. Nice to be able to travel till you drop anchor wherever.
could you provide more info about how you screen your windows? Thanks.
DeleteI am planning on doing a minivan rv usin a dodge grand caravan, and thinking a wireframe, bent to fit the rear vent windows and front front windows
DeletePlanning to incorporate some of your ideas in my van. Question: where did you generally camp? I've read and have been considering truck stops and Wal-Mart lots. Tried that? Garry
ReplyDeleteCasinos are great places to urban camp. Wonderful, cheap meals, and security.
DeleteGarry,
ReplyDeleteWe generally camped in state and national parks. You can't beat the price (usually $8 if you're 62 or older and $16 otherwise). We found the Wal-Mart scene to be a little creepy, bright lights and asphault (but some swear by it!). Truck stops? Try parking next to an 18-wheeler with its motor running all night! We did.
Some of you others ask questions bu I can't figure out hows to reply directly to you. When I hit "reply" after you comments, nothing happens. GT
Yeah parking at walmart or any retail parking lot for that matter can be annoying, especially when at 3 am in the morning a street sweeper beings to clean the lot :) I too love my VW, but recently have been considering one of these. Can i ask you how much you paid for the sienna and the year? And what is your actual mpg? Also, about how long did it take to finish the conversion? Did you fabricate your own mats, or were you able to find covers?
ReplyDeleteJ,
DeleteWe bought a 2004 with 95,000 miles for $8,400. It's been terrific.
The actual millage is @24-25 HWY and 19 in the city.
The conversion took two weeks, 20-25 hours. We made out mats in three parts
and they velcro tother while sleeping. Small "lips on the bed frame keep them in place as well.
It's hard to find great conversions for mini vans and I really like this one. I love the idea of using hinges to get at the storage under the bed. It seems that you have more room then I would have expected. Do you have any recommendations for a single van dweller? Since I see your bed can fit two. Perhaps do 2/3rd of the van for bed and couch then the other third for storage. hmm.
ReplyDeleteHola Theresa,
DeleteIf I alone were living in the van I would use a third of the present bed space for storage, maybe on one side, floor to ceiling. We even have a "bathroom" in ours that's the side of a phonebook! We turn our plastic filing stool into a ...well, y'know, when we rarely need it.
As you've probably noticed, there are many sites for van-dwelling ideas. They've got all kinds of suggestions. Good luck!
Glenn
I know this is sort of an old post but there is this incredible solo conversion at this link: cheaprvliving.com/Katies_Astro.html
DeleteI'm working on a sort of hybrid of your design and this guy's.
Thanks for taking the time to explain the design, it was incredibly helpful!
Also looking to do a minivan RV, but using a Dodfe Grand Caravan... and the bed I plan on running from behind drivers seat all the way to the rear hatch (long enough for my over six foot tall body) width of 30" - 36" with a hinged front that flip up for ext width... cushion with back that velcro together, a flip up section in the rear to stow a small chemical toilet.
DeleteThat link is now ..... http://www.cheaprvliving.com/converting-astro-mini-van/
DeleteGlenn,
ReplyDeleteNice Job!!
I just bought a sienna after seeing your post. I can see how you made the bed. Do you have any additional photos or help you can offer for the side shelving, drop down table, and couch locks.
Anything you can offer as help would be greatly appreciated.
Thanks,
Steve
SteveisTrippin@hotmail.com
Thanks Steve,
DeleteCongrats on your Sienna purchase! Maybe I can take more photos to explain the couch locks and such. What we use to hold the back of the couch up is two pieces of 1/4 " wood (about 20" x 1.5") with a hole in each end. WIth the couch up it forms a triangle (with the bed frame and the back of the couch) to hold it all together. The supports are bolted to the frame (bottom) and and temporary 1/4 " bolts attach to the top of the back (held in place with a bit of tension by bungee cord. It would probably be better to make the supports out of 1/8" steel as our wood supports have a tendency to split under stress. When the couch is in bed mode the supports fold down nicely next to the bed frame. When not in use, we keep the temporary bolts with their attached bungee loops in a nearby cup holder.
The "drop down table" is actually stored in the back hole (we call it "the basement") and with all the good weather we encounter, we rarely use it. We prefer the picnic tables at camp sites.
The side shelving? We measured a lot and used a lot of cardboard to see how the shelves should be cut to match the curves of the walls. Get creative!
I guess I should take pictures of all these things to make it easier for guys like you.
Glenn
We just today got our sienna mini-van and we are excited for our first trip. I love what you've done with the place. hmmm, 20 - 25 hours? It will likely take us (much) longer than that. Would love more photos. We're having a challenge figuring out the hinge system for the front legs of the bed.
DeleteI love my 2004 Toyota Corolla Mini RV ! Love your van !
ReplyDeletehttp://groups.yahoo.com/group/MobileDwellers_SouthEast/?yguid=130023685
Blessings2U,
Wolf
Thanks Wolf,
DeleteHow sweet it is to drive a Sienna camper (as opposed to a VW -I've had 3-) not worrying if it would make it to the next repair shop.
Blessings 2 U 2,
G
RE: Screens
ReplyDeleteIf you have steel around the windows go to one of the craft stores and pickup enough 1/2" magnetic tape to surround your window(s). It glues to fiberglass screening with gel type glues like GOOP and you can have custom shaped screens for your windows. I used it on the windows of a F 150 when I slept in the cab. It worked well for me as long as I wasn't trying to drive anywhere and I slept in some seriously mosquito laden areas too!
Hey Belly of Blue,
DeleteYour system sounds great. We just use the magnetic discs to keep our screens in place (about $4 for 10 at Walmart, 2 0r 3 sizes). It doesn't take long to put them up. Your method sounds like it goes up quicker but ours might store in a smaller space.
g
Absolutely fantastic Glenn! I would love to see more photos detailing the construction. I have a 2006 Sienna and have been looking for ideas and inspiration to go beyond my minimalistic approach of sleeping on a pad on the floor and Rubbermaid bins. This is how I addressed the mosquito/midge netting on mine:
ReplyDeletehttp://www.flickr.com/photos/21624415@N04/6772837614/in/set-72157621867029259
http://www.flickr.com/photos/21624415@N04/6775828058/in/set-72157621867029259/
I sewed a 2mm cord into the perimeter of the netting, in the shape of the front window frame. That keys into the weatherstripping and the door is closed. Then a tight fitting stick pins the bottom of the screen against the lower sill. The wind deflector allows the window to be cracked a couple of inches during rain and it works well though the ventilation is inadequate for the hot months in the south. I'll do something similar for the center doors though perhaps with Velcro or magnets.
John Clay
jmedclay@yahoo.com
I saw your blog and now own a Toyota Sienna. With all the positive response you have gotten, have you been inspired to publish your conversion plans? We are not blessed with your ability and need some help. Looking forward to hitting the road in style.
ReplyDeleteDear Crafty One,
DeleteWe think you'll have a great time converting your van into something you can camp in. We look forward to helping folks like you.
My wife (Francesca) and I are travelling a lot this summer to places too far for our Sienna. When we return in August we can publish more information and photos. Specific questions? Our best e-address is bettermiami1@yahoo.com.
Crafty Too (Glenn)
Hola Crafty,
DeleteI added more information (and photos) to my conversion story today.
Glenn
Nice work---especially the beautiful shelf unit next to the rear vent window. My Sienna has been modified for car-camping with a flat/level floor, shelves, spare tire storage in the seat well, curtains, a center console, and plywood storage boxes that double as a sleeping surface. Photos here: http://www.flickr.com/photos/listorama/collections/72157606113808923/ . Happy camping!
ReplyDeleteYes, there are many ways to build a camper. This version works great for us. Thanks for sharing and happy camping to you.
DeleteHola Listorama,
DeleteThanks for sharing your plans. We prefer the more permanent set-up, I guess. Your "easy on the eyes" milk jug lamp is sheer genius!
You mentioned a trip on the Oregon Trail. Did you ever do that? I'd be interested because I want to do the same thing.
ReplyDeleteWow Glenn,
ReplyDeleteFirst I have got to say this is one of the most beautiful and well built examples of a 2 person camper from a minivan I have ever come across.
It had been my dream to do this for years and I finally built my own this past summer to take with me while working in Northern British Columbia doing some tree planting. I used a system similar to your hinged to allow different setups and storage access but it was very rudimentary (milk crates were involved) and after seeing your great design I am strongly considering a renovation for next spring.
I am wondering though where you do most of your cooking? do you use the table in front of the couch, remove that cushion over your basement, or simply use picnic tables?
Hello Aeryk,
ReplyDeleteThe "reply" option doesn't work today so I'll comment saying I'm glad you like our conversion. It's pretty simple but it works for us. To answer your question, we cook on picnic tables most of the time. We think the smaller the camper, the more time you get to spend outside and "outside" is where it's at. Right?
We do some cooking inside in bad weather or if we want a late night cup of tea. Then we fire up the propane stove "in the kitchen", the shelf on the left side. It's just big enough to hold the stove.
I did something similar, but different with my Sienna. Since I still drive to work 5 days a week and need to carry 4 people in a street legal way, I took out the back seats, and built two storage areas. I then built a short table/platform that lines up with the back storage areas and can form a sleeping platform, when the middle seats are taken out for weekend camping trips. Some pictures are shown at:
ReplyDeletehttp://petersimmons.ca/category/minivan-conversion/
Thanks for sharing your ideas, Peter. Our van is just for camping and a backup when our other two cars are in the shop. I'm glad you can use yours for "everything". G
DeleteVery nice job i just bought a grand caravan and was looking for some ideas. Love what you got going on . Thanks for the tips
ReplyDeleteI also plan on doing one with a grand caravan... I bought one that was modified for a wheel chair (the floor has been lower 10" and it has a ramp that folds out the passenger sliding door.
DeleteI have stripped a few RVs and conversion vans, and have most of what I need to convert either the 2000 rp van or another van into a minivan RV. Just a matter money
I aldo want to add a raised roof (high top) found one thats about $1100 new.
Also want to tow a small cargo trailer behind it, with my generater, water, propane and fuel tanks.
The ramp van, has had the fuel tank to the rear where the spare tire usually is, and the spare mounted inside, against the rear seat. So not sure if I can find a hitch that will fit it.
I have to visit this page frequently so I can use the knowledge I got here when I buy a Suzuki APV to travel with my future family. Nice blog!
ReplyDeletehttp://hunkrideradventures.blogspot.com
Hello HunkRider,
DeleteI'm glad my blog was able to help you out. Our van has 110,000 miles on it now and we'll enjoy adding about 7,000 move this summer.
I have posted more pictures of what I did on Flickr:
ReplyDeletehttp://www.flickr.com/photos/petergs/sets/72157633700840665/
This comment has been removed by the author.
ReplyDeleteI admire what you have done here. I love the part where you say you are doing this to give back but I would assume by all the comments that is working for you as well. Do you have any more info on this?
ReplyDeleteDU-104 Drums
Tone
Dear Commenter Friends,
ReplyDeleteWhen you write comments that ask questions I have no way to respond directly. Blogspot does not make this easy.
If you've a question, just write directly to me, bettermiami1@yahoo.com. This address is in my blog too but it can be hard to find.
Glenn, the Grove guy,
Coconut Grove
PS:
Maryam- The only info I've published is in the blog. Go back to June 2011. That's where I write about building the camper.
People are encouraging me to write a book about converting vans. I suppose I will when life slows down a bit.
Jeanne, Here are y answers to your e-mailed questions,
ReplyDelete1) No,we didn't insulate our van. We live in the South where
it doesn't get too cold. When it is hot, we go north where it
is cooler! We also use fans (plug-in and battery powered)
at times. Insulation, I think, would take away a lot of interior
space.
2) I did not attach the shelves to the walls. They are a part of a ceiling-to-floor "shelf unit". This is screwed into the bed frame. All of it is wedged in between the two walls and it does not move at all while driving. I built it to "fit tight" and there's even little felt pieces to keep the wood frame from pushing the walls too hard or rattling. The many floor legs (and gravity) help it to stay in place as well. Happy weekend,
Glenn
VW Campers are such a thing of elegance although the breaking down as you described could often be problematic. They almost take driving back to how it used to be. I don't know if you heard or not but the Brazilian factory that actually still produced them today is actually closing down so they will finally cease production. Sad day.
ReplyDeleteKeith Johnson
Stoltzfus-Rec
I've been camping solo in my minivan (Voyager) for several years. I took out both back seats and simply use a cot (springs are nice!). I store everything underneath. On the other side I have room for a potty (10 gal bucket with toilet seat top (Walmart) and garbage can liners), a folding bike, and an ice chest. A clothes bar holds my clothes and I push them to one side or the other as needed. I made curtains, but one problem I haven't solved is screens for the windows. Anyone have any good ideas?
ReplyDeleteMINI-VAN SCREENS: We cut plastic screen material to the shape of our four windows that open (you could do the back hatch as well). We make them 2-3" larger than the opening. When needed, we take them out of a storage bin, unfold them, and place them on the outside attaching them with magnets, available at Walmart and other stores. It doesn't look great but it works. No problem raising the windows when it rains too.
ReplyDeleteI saw some one who had cut screens to window size plus an inch, folded the outside inch over (at the 1/2 inch point) with a rubber screen bead inside. He then sewed it up (whew!). He'd then stuff the edges into the window slots going around each open window. Crazy but creative just the same...awful when it rains at 2 a.m.
OH MY GOSH
ReplyDeleteserious jealousy and wanderlust here
i'm a 17 year old kid with a banjo, a puppy dog and a love for road trippin'.
i think my first car is gonna have to be a van. i can still drive to work but then just go when i've got to.
this idea was sparked a while back and every day i get more and more infatuated with it.
thank you so much for these ideas and inspiration.
you, sir, are awesome
~Abigail
Abby, I don't know about me but I know YOU will be awesome if you put together your own road trippin' minivan. Imagine gliding along in your mobile home with your banjo, and puppy dog, cruising down a mysterious road not knowing what lies beyond the next bend.
DeleteExploring Northern California at the moment,
Glenn
Very good information in this blog .All our facility in this car good option so looks are very good and multi level van , thanks
ReplyDeleteCentral London Basements
This comment has been removed by the author.
ReplyDeleteAfter our 2000-mile trip from the Bay Area to Seattle, we did some modifications to our van:
ReplyDelete1. We shortened the bed to have more room behind the front seats.
2. Narrowed the bed to have more room for the shelves.
3. Added a deep cycle battery to run our 40 L cooler, and 1000W inverter for microwave oven and rice cooker.
We use the rice cooker while we are driving so it does not affect the battery. The cooler is 12V and can run 15 hours on the battery. We only have to watch the battery when we stopped to cook or heat food suing a stove or microwave. I installed a disconnect switch between the 2 batteries to make sure nothing is connected to the car battery at night.
We took a trip last week to Humboldt Redwood State Park and everything worked as planned. One night the deep cycle battery ran out of juice because we used too much inverter and stove.
I have not been able to attach pictures to the post. May be Glenn can help me with this.
B) Another way is to build a simple frame for your bed, say, 6' x 4' with four cross pieces (I ... couchbedframe.blogspot.com
ReplyDeleteI just want to say AWESOME!!! Good job!! I have some interesting custom jobs on my blog too. Check it out one day. www.mutoart.blogspot.com I aldo post lots of paintings. I'm an artist.
ReplyDeleteThanks for the inspiration!
ReplyDeleteI am a great fan of Toyota Sienna van!! I really want to buy this one day for my family. You really made great changes in your van, really helpful tips for me. Hey I don’t have my personal Van for now, but can you suggest which campervan hire Australia services are best?
ReplyDeleteWe just came back from a 3600-mile trip in Mar and Apr 2015 visiting 9 national parks, 1 national monuments, Antelope Canyon, and Monument Valley in UT, AZ, and CA. Everything worked out great except that our parks are getting popular and there are more visitors than we expected at this time of the year.
ReplyDeleteOne mod we are looking into is getting a better 12V cooler. The one we have now is inexpensive but it just runs regardless of the inside temperature. Couple mornings in Bryce, the contents froze when outside temp dropped to 32 degrees. A better cooler has set temperature to stop the compressor when the set point is reached. This also saves the deep cycle battery that we have.
As a Swiss, I recently started researching about Van rentals in the USA for a trip in May/June 2016 to visit serveral National Parks in Western United States. The options I found so far are huge RV's and motorhomes. But I really prefer a camper van / converted van as mentioned in this blog here to stay on campgrounds in the National Parks - I don't need a huge fancy home on wheels. So my idea is to rent such a van from a privat owner, if possible - like a Toyota Sienna or Volkswagen T5 or similar and take care on an appropriate insurance cover. So I really appreciate recommendations or suggestions to be hopefully able to rent such a van in California/Utah/Colorado for about 6 weeks, beginning of May 2016. thank you
ReplyDeleteFlorindo:
DeleteYou should look into www.jucyrentals.com or www.escapecampervans.com. They have vans for rent. On our last trip to southwest national parks, we saw many of these.
Good luck,
Ninh
Yes, we see these rental camper vans all over the west. Jucy and Escape, along with a few others, seem to have attractive campers. You can spend $200 per day for one of these but I prefer to make (and enjoy) my own rolling home. As I've been away from home for 40 days now, I guess I have saved $8000 in rental fees so far.
DeleteFantastic work and great blog. I'm really hoping you come out with a book soon! Until then I'm going to be coming back to this page for more ideas and info. Thanks for sharing the pictures.
ReplyDeleteThnx Greg. Just drove 5000 miles in the last month touring the wild west again. We LOVE our van!
DeleteI did a long trip last summer (CA to Yellowstone to Regina and Winnipeg to WI to Chicago to StL and back to CA with many more pts between) in my Caravan. I didn't get fancy. My van has the seats that fold into the floor. I made a couch pad bed along one side of the van and put my camping gear and luggage across the back. That gave me plenty of headroom. A couple of things I did for comfort and privacy were to cut black foamcore inserts for the back side windows and the rear window (the side ones just popped in, I used stick-on velcro dots for the back) and used gaffers tape to cover the side windows on the sliding doors with screen fabric. that way I could put the windows down and get a good cross-breeze. If I was feeling unsafe, I could still put the windows down several inches. When I was younger, my sister and I "camped' by putting a twin mattress in the trunk of a 1960 Impala and fastening fabric around the open trunk with clothespins. That's how I give myself a dressing room when mosquitos are not an issue--just open the rear hatch, clothespin or binderclip fabric (sheets work well) to the hatch and put a rug on the ground. I think I may have to build me a bedframe now, though!
ReplyDeleteBrilliant design! I copied it for my 2007 sienna, I used an single IKEA pine bed for the base turned the headboard upside down and used a 2' drawer slide to slide in for the seat and out for the bed. I used 3/4 ply for the bed hinged like yours. I made the seat back low enough to see out the back windows. Then with only a few inches left, I hacked an IKEA small 3 drawer 1 foot wide x 3 foot chest in to a sink with a large stainless steel bowl, a grey water tank and two small drawers. This is mounted on flat mounted drawer slides I can slide forward with the front passenger seat. there is a folding shelf that folds out the side door for cooking if there is no table. also i made refletex window covers with black fabric sewed and glued to one side these have grommets which hold clear plastic suction cups that attach to the glass.Your design is the best i've seen for a minivan, i'm inspired!
ReplyDeleteJim, interesting idea using IKEA materials. Any pictures you'd care to share? I'm having trouble visualizing how you did it. - Andy (gaanders2002@gmail.com)
DeleteHey Andy, I've added photos of my sliding sink-drawer-table Ikea small chest of drawers hack to my blog.
DeleteI'll add photos if the slide out bed -couch. later.
http://minivanhaus.blogspot.com
You're very kind, Jim. We are currently enjoying our van in Yosimite NP. I feel like a trout swimming in the clear, cool, Tuollome River.
DeleteHI Glenn. Really like your design as many folks before me. I have not seen as far as I can find any info on your shelve which looks beautiful.
ReplyDeleteJust wondering how you keep in in place, did you put the stove on the table or shelve to cook, how did you attach the table, and is that a drawer. I am thinking that I want to build the shelve first and use the bed frame and van to pressure fit it in.
Any help or suggestions would be much appreciated
Thanks so much from the far north.
Myles
You can build the shelves and bed frame separately. Everything stays in place because the frames rests against the walls (snug, with 1/4 inch felt pads in-between. I rarely use the stove inside. Picnic tables work fine. Yes, that is a drawer that opens to the inside and (with the port side door open) outide as well.
DeleteThis comment has been removed by a blog administrator.
ReplyDeleteNow that some great idea posted above in blog. I would like use the same idea in my Dodge Caravan to modify and outlook it with some more new added ideas. Innovating one's vehicle with such such great ideas is truly a great concept.
ReplyDeleteThis is too good to have to get this post. I like what effort you make. Good Job!
ReplyDeletemini van rental
Great site working on converting our 2007 short wheel base Dodge minivan to part time camper will use the bench seat in the open folding back towards the back window to 30 de and the two captain seats folded to support the bed any body done this
ReplyDeleteGreat Blog We provides screen hinge door online, screen sliding door, shower door pivot hinge replacement parts, There are many variety of shower enclosures, shower doors and shower rooms mail me at export2@dabbl.de or visit now Shower Doors, Screen Sliding Doors, Shower Enclosures
ReplyDeleteThanks for the wonderful article. Mosquitoes are very dangerous and harmful so the best option is to avoid them. And the best natural way is the window mosquito nets and bed mosquito nets. Repellents can also cause health problem.
ReplyDeleteAl’s Trailers is an Oregon RV dealer and major provider of RV parts, Supplies and Accessories. We specialize in New and Used.
ReplyDeleteMore Details: Al’s Trailers
Wow, I must admit that I have not come such a creative idea. The idea of transforming a car into a camp is very innovative. It will be of help to a larger percentage of people who like camping and I will be recommending this site to our professional writers who help students with requests such as “Paraphrase My Research Project”.
ReplyDeleteHi Glenn! I really love your minivan conversion! I'm looking to do something similar with my minivan too. Maybe you can answer my questions about the pop up table you made. How does it work? Where do you store it? Thanks a lot!
ReplyDeleteCatherine
Thanks for sharing this beautiful idea..
ReplyDeleteI Recently went out for camping with my friends and hired tear drop camper that was really amazing and comfortable too!!
I just wished to say thank you so much for fantastic support on Weekend. The two people were definitely amazing. I would definitely suggest Top 7 packers and movers Chandigarh anyone.
ReplyDeleteIt’s great and thanks for sharing about minivan conversion, it will grateful for people. Also you provided best services, I really like this post, thanks for providing useful info with us!
ReplyDeleteVan rental Xpress
I have a 2007 Honda Odyssey, I am interested in converting it into a mini RV for my wife and I. We want to do some traveling and have as many amenities as possible but also have a comfortable place to sleep in, maybe eat in, etc.
ReplyDeleteI want to find plans on how to do this that I can hand to a person to have build it for me, like a handyman.
Does you have plans?
Know where I can get plans?
What do you recommend I do?
Thanks Hal
Hi Hal, Searching the web you may find van plans that are right for you. On my blog, I just share what I, and a few few friends, did. Good luck. I recommend that you figure out what you want, buy a van that's complete, or find "a handyman" who will build one for you. Glenn
DeleteThis blog is nice and very informative.
ReplyDeleteFor top class luxury van conversion visit BeSpoke Coach.
For more detail visit: https://bespokecoach.com/
I just stumbled throughout your weblog as I was searching on Yahoo. I choose to thanks for using the time to share your feelings on your blog. I will make sure to bookmark your site for long term reading through.
ReplyDeleteAC Repair Miami
I love your bed design and am thinking about doing the same. Do you have any plans available? Thanks a lot, Pattie
ReplyDeletewww.lampungservice.com
ReplyDeletelampungservice.com
Indonesian Courses
Komponen HP
Cara Menghidupkan HP Mati Total Baterai Tanam
Macam Macam IC
Cara Memperbaiki LCD
Lembaga Kursus Terbaik Indonesia
Cara Menghidupkan HP Mati Total
Youtube
Thank you for the information it was so helpful. Are you desperately looking for dissertation help online? Well we got it all just go to Dissertation help online
ReplyDeleteThank you for the information it was so helpful. Are you desperately looking for dissertation help online? Well we got it all just go to Dissertation help online
ReplyDeleteGreat blog! Inspirational to see these innovative solutions to problems I've been trying to solve with my own 2006 Toyota Sienna that appears to have need of emissions parts (Check Engine: P0420) now that I've put money into the "camper" side of things. Oh well...
ReplyDeleteNice post, I will try it. Thanks for sharing. You can also check Project Editing Help for assistance with editing or rewriting your articles.
ReplyDeleteHello Dear,
ReplyDeleteI Like Your Blog Very Much. I see Daily Your Blog, is A Very Useful For me.
You can also Find campervan conversions Happy Campervan offers you campervan conversions in the Dorset, Hampshire and Bournemouth at happycampervan.co.uk. Call us now to arrange a free consultation at our conversion depot.
Visit Now:- https://www.happycampervan.co.uk/conversions
ReplyDeleteData analytics service Maveric Analytics Hub is a globally acclaimed, statistical analysis platform providing competent, professional and renowned services to academia and corporations
campervan conversion companies - Welcome to Super Cool Campers Company, We are one of the best campervan conversion companies in Bristol, England that provide the Bristol campervan rental services. Get the campervan conversions to hire near me.
ReplyDeleteHello Dear,
ReplyDeleteI Like Your Blog Very Much. I see Daily Your Blog, is A Very Useful For me.
You can also Find Insulation Contractors in West Virginia Are you searching for Spray Foam Insulators? Enviroseal Spray Foam is one of the leading Spray Foam Insulation, Contractors in West Virginia. Call Us: (304)-533-0598
Please Visit at: http://envirosealsprayfoam.com/
This comment has been removed by the author.
ReplyDelete
ReplyDeletePaper Lords is one of the leading academic writing services uk provider agencies in the United Kingdom.
We have been offering our services in the market for over 5 triumphant years.
Thank you! for giving such an informative article . It found really helpful. Nowadays people prefer best in everything. If you are looking for best Memory Foam mattress in india I suggest you for Magniflex Mattresses.
ReplyDeleteThis is Very very nice article. Everyone should read. Thanks for sharing. Don't miss WORLD'S BEST ANDROID 👉 DownloadGames
ReplyDeleteWe are well established IT and outsourcing firm working in the market since 2013. We are providing training to the people ,
ReplyDeletelike- Web Design , Graphics Design , SEO, CPA Marketing & YouTube Marketing.Call us Now whatsapp: +(88) 01537587949
: SEO Service Company
good post Mobile XPRESS
Free bangla sex video:Delivery Companies in UK
good post Mobile XPRESS
Do you need an urgent loan of any kind? Loans to liquidate debts or need to loan to improve your business have you been rejected by any other banks and financial institutions? Do you need a loan or a mortgage? This is the place to look, we are here to solve all your financial problems. We borrow money for the public. Need financial help with a bad credit in need of money. To pay for a commercial investment at a reasonable rate of 3%, let me use this method to inform you that we are providing reliable and helpful assistance and we will be ready to lend you. Contact us today by email: daveloganloanfirm@gmail.com Call/Text: +1(501)800-0690 And whatsapp: +1 (315) 640-3560
ReplyDeleteNEED A LOAN?
Ask Me.
Fox Chamber provide best services Fox Chamber best services offer to help all kind of solutions like website development, keywords ranking, social media marketing and much more.
ReplyDeleteFox Chamber is a global leader of Next Level Solution. IT services and BPO solutions. Fox Chamber providing computing strategies and solutions to Government and Private Organizations.
ReplyDeletenice blog plzz visit my site too.
ReplyDeletebetter mortgage rates
car transport cheap
Great post. I was checking constantly this blog and I’m
ReplyDeleteimpressed! Extremely useful information specifically the last part
🙂 I care for such info a lot. I was seeking this certain information for
a long time. Thank you and best of luck.
visit my site too
Window and door Repair Services Miami Florida
Window Repair Service Miami Florida
Screens Enclosure Repair Service Miami Florida
Door Repair Service Miami Florida
Miami Glass Repair Service Florida
Sliding Glass Door Repair Service Miami Florida
Patio Door Repair Miami Florida
Window And Door Replacement Service Miami Florida
Pet Door Installations Service Miami Florida
Scholarships for Students. Provides information about Top Scholarships all over the world, which are consists of Undergraduate Scholarship, Master Scholarships, and Ph.D. Scholarships as well as Internships.
ReplyDeleteIn case you happen to be an electric Motorized Skateboard enthusiast, you might be searching for an innovative challenge. If you are an adventure buff, make it a point to use an electric longboard for traveling to your target destination.
ReplyDeleteThis comment has been removed by the author.
ReplyDelete
ReplyDeleteNice post. I used to be checking constantly this blog and I am impressed! Extremely useful info particularly the ultimate section 🙂 I take care of such information a lot. I was seeking this certain information for a long time. Thank you and best of luck.
atma nirbhar bharat essay
This comment has been removed by a blog administrator.
ReplyDeleteDo you need an urgent loan of any kind? Loans to liquidate debts or need to loan to improve your business have you been rejected by any other banks and financial institutions? Do you need a loan or a mortgage? This is the place to look, we are here to solve all your financial problems. We borrow money for the public. Need financial help with a bad credit in need of money. To pay for a commercial investment at a reasonable rate of 3%, let me use this method to inform you that we are providing reliable and helpful assistance and we will be ready to lend you. Contact us today by email: daveloganloanfirm@gmail.com Call/Text: +1(501)800-0690 And whatsapp: +1 (501) 214‑1395
ReplyDeleteNEED A LOAN?
Ask Me.
Great Post. Thanks for sharing with us. For window installation Visit my website: window installation miami
ReplyDeleteMCA Live Transfer Leads professional guarantees to deliver best qualified for MCA Aged Leads with precise and updated knowledge prepared for conversion MCA Live Leads.
ReplyDeleteGreat Post! Thanks for sharing such beautiful information with us. Please keep sharing.
ReplyDeletePlease visit Florida Pools Pros
Nice blog to read and great content would like to recommend to my friends. We Ezy Cash for Cars south Brisbane looking to buy your old cars for best cash give a chance to us we will take over your stress of sell it.
ReplyDeleteI truly appreciate this post. I have been looking everywhere for this! Thank goodness I found it on Bing. You have made my day! Thank you again Swimming Pool Services
ReplyDeleteGreat Blog. This blog information is informative and usefull. if your finding "https://urgentmanandvan.co.uk/"house removal watford then visit our site urgent man and van.
ReplyDeleteIt's one of the best blog you have shared. Most famous mattress store supply custom mattresses, cheap king mattresses, discount double mattresses, natural mattresses, single mattresses, Queen mattresses & RV mattresses at affordable rates. Order Online!
ReplyDeleteBest mattress warehouse Winnipeg
I truly appreciate this post. I have been looking everywhere for this! Thank goodness I found it on Bing. You have made my day! Thank you again
ReplyDeletehttps://www.lcrenovation.co.uk/loft-conversion-in-wimbledon/
House Renovations in Herne Hill
Great Blog. This blog information is informative and usefull. if your findinghouse removal watford then visit our site urgent man and van.
ReplyDeleteWonderful blog great appreciation to the blogger and hoping for fantastic content in future. Surely, this post will inspire many aspirants who are very keen on gaining knowledge. We are the pioneer in the automobile industry looking to buy old cars. We give top cash for cars brisbane for any condition anywhere.
ReplyDeleteNot until today many of us know that Toyota Sienna can also be converted into RV. Thankyou for the blog. We also help people in building their van and also share thoughts on the van life through blogs as 14 Things You Must Know Before Living The Van Life , Please spare some time and read it
ReplyDeletevery much thank you for the wonderful info. as i was looking for submititng url to websites. Yours is really helpful to me.
ReplyDeletehttps://www.lcrenovation.co.uk/renovations-in-richmond/
House Renovations in Richmond
That blog was amazing, I am impressed with your thoughts. I got the best information from this site, It’s very useful to all and us. Thanks for sharing this post.
ReplyDeletehttps://www.lcrenovation.co.uk/loft-conversions/
Renovations in Vauxhall
Glenn... Glenn here. I had a 2003 Dodge Grand Caravan and it was great but getting too old. Now have a 2006 Honda Odyssey and love it. First trip I just put in 4 fold top totes and a 48qt cooler to make my bed. With some 1.5in construction board and a 28" tri fold mattress I was all set. 6000mi 4 national parks and most of my 7 brothers, sisters, in-laws and out-laws I am totally hooked on this way to travel. Thanks for all your great ideas
ReplyDeleteAwesome thoughts!
ReplyDeletehandyman san Francisco
Thanks for the wonderful blog.
ReplyDelete3 in 1 Bed
Getmyrugs provides 6'x8' area rug at estimated prices.
ReplyDeleteWooden Designer Modern Bed Design with Sliding Storage ⭐ directly from manufacturer made up of Sheesham Wood ⭐ with Easy Customization ⭐ Easy EMI ⭐ Free delivery. Double Bed Design
ReplyDeleteI wanted to thank you for this excellent read!! I definitely loved every little bit of it. I have you bookmarked your site to check out the new stuff you post
ReplyDeleteRent a Mehran in Islamabad
This blog is amazing content, which is very useful to me, I would like to thank you for sharing the content. I am also doing the same post about best window and door company near me. read and get some related information.
ReplyDelete
ReplyDeleteHello everyone
Find the best wireless security cameras to protect your home.
Thanks for sharing.
los Angeles security cameras
Los Angeles home theater installation
intercom repair Los Angeles
home theater Los Angeles
camera repairman
security camera Los Angeles
Los Angeles professional security
professional security camera installers
professional security cameras installation
house camera installation
I like your blog because that this blog contains informative knowledge. If your are looking for these best Man and Van Hire Kingston services. Our company provides the best services in United Kingdom.
ReplyDeleteThis comment has been removed by the author.
ReplyDeleteI am looking for a upcoming Ford Super Duty 2023 Car Online 2023 Ford Super Duty
ReplyDeleteGet a detailed reviews of Difference between Jetta R Line and Gil Cars Jetta R Line Vs Gil
The blog seems to share interesting tips Buy RV mattresses Winnipeg I like this information as want to buy custom mattress online. Maybe I will share with facebook group friends about this blog.
ReplyDeleteAwesome! Thanks for sharing with us. Keep writing and updating something on how can we do Campervan Hire South Island NZ.
ReplyDeleteNice post...
ReplyDeleteDownload DiRT Rally Crack
Kutools for Excel Crack
DipTrace Crack
https://free4soft.co/waves-vocal-crack/
Nice post...Waves Vocal Rider Crack
ReplyDeleteTurboFTP Crack
Download DiRT Rally Crack
Beginning a business or searching for ways of upgrading your item or administration contributions? Think about this: App development company Dubai is demonstrating its ROI in numerous ways, conveying wonderful incentives for an expansive scope of businesses that go a long way past gaming and other diversion-related applications.
ReplyDeleteNice post..Waves Vocal Rider Crack
ReplyDeleteTurboFTP Crack
Sound Forge Pro Crack
Device Doctor Pro Crack
Nice pst...Waves Vocal Rider Crack
ReplyDeleteTurboFTP Crack
Sound Forge Pro Crack
Device Doctor Pro Crack
Amazing reading it. Love to read it again
ReplyDeleteRV conversion Cord
This comment has been removed by the author.
ReplyDeleteAriana Rugs...has joined the certification program, marking an international milestone as the first importer of Afghanistan rugs with a supply chain that is certified child-labor-free.
ReplyDeletehandmade Ariana rugs for sale
Hello, Thank you for giving me this beautiful blog.
ReplyDeleteI really enjoyed reading this post! It was well-written and had great insights. Thank you for sharing. If you are looking for the best van conversion company, then Tiny Topanga is a trustworthy and skilled custom van conversion builder. Our skilled construction team can assist you in designing the ideal vehicle conversion for your needs. To get started, contact us today.
ReplyDeleteNice Blog
ReplyDeletePackers and Movers in CR park!
This comment has been removed by the author.
ReplyDeleteI really enjoyed reading this blog post on the Toyota Sienna van conversion! It's great to see such detailed information about the process. The way the author explains the conversion steps is very clear and easy to understand. I also appreciate how they've included pictures to help visualize the process. This blog is a fantastic resource, especially for those interested in Old Cash For Cars Petrie Terrace.Keep up the good work!
ReplyDeleteThis Toyota Sienna van conversion is truly impressive and showcases the creativity of automotive enthusiasts. On a related note, for those in Adelaide who might be considering a change in their vehicle situation, services like "car wreckers Adelaide" could provide valuable assistance. It's fascinating how the automotive world offers such a diverse range of options, from custom conversions to responsible vehicle disposal. Kudos to the author for sharing both innovation and practical solutions! 🚐🛠️
ReplyDeleteI'm loving this Toyota Sienna van conversion project you've shared! It's amazing to see how creative people can get with their vehicles. Speaking of vehicles, for those looking for a reliable solution in Caboolture, the "car removal Caboolture service" could be a game-changer. It's great to know that options like these exist for giving old vehicles a new purpose. Keep the inspiring projects and practical solutions coming! 🚐🔧
ReplyDeleteThis comment has been removed by the author.
ReplyDeleteThis Toyota Sienna van conversion is truly impressive and innovative! 👏 Speaking of transformations, did you know you can easily get some cash for scrap cars in Melbourne? It's like giving old vehicles a new lease on life. Keep up the amazing DIY spirit and who knows, your next project might inspire others to recycle and reinvent too! ♻️💰 #CashForScrapCarsMelbourne
ReplyDeleteThis Toyota Sienna van conversion is seriously impressive – talk about creativity and innovation! 🚐✨ And if you're ever in Sydney, did you know there's an option to get some cash for junk cars? It's like turning unused vehicles into a new opportunity. Keep the DIY spirit alive, whether it's transforming vans or exploring solutions like cash for junk cars in Sydney. Cheers to making the most out of what we have! 💡🚗 #CashForJunkCarsSydney
ReplyDeleteThe Grove Guy's minivan modification is revolutionary! We can convert our vehicles into comfortable campers thanks to your site. Your guide offers doors to mobile activities just as Relax CBD products provide flexible health treatments. Your exchange, which began in 2011, keeps the spirit of discovery alive. We appreciate you sharing your knowledge and fulfilling campers' wishes. Here's to hitting the road in comfort and with energy from CBD. #VanLifeAdventures #CBDWellness.
ReplyDeleteYour insights on The Grove Guy are intriguing. And the subtle inclusion of a teething tube is a delightful connection, highlighting the importance of family dynamics even in the world of nature and gardening. Great read!
ReplyDeleteI love how your blog combines creativity and practical advice. It's my go-to for a perfect blend of inspiration and information.
ReplyDeleteluxury Portable Ensuite hire melbourne
Are you looking for the Best car wash in kingston? Don’t look further, car life wash is one of the best car wash in Kingston which provides you the best services regarding washing cars. For more information contact us at : +1 647-561-9678.
ReplyDeleteWhat an inspiring conversion project! It's wonderful to see creativity and functionality come together. The demand for sustainable transport solutions is growing, and seeing an electric minibus for sale would be a fantastic addition to the market.
ReplyDeleteAwesome tips! If anyone decides not to convert, you can still get cash for vans whether it's a scrap van for cash or you're looking for cash for junk vans. You can even get top cash for vans easily. Thanks for sharing!
ReplyDelete"This minivan conversion project is fantastic! I love how you've documented the process step-by-step, making it easy to follow for anyone looking to transform their own van. It's inspiring to see the creativity and attention to detail you've put into every part of the build, from layout planning to material choices, including how you tackled the real engine mount . I can't wait to read Part Two and see how the final details come together. Thanks for sharing your journey!
ReplyDeleteThanks for sharing this informative post. I really appreciate your efforts and I am waiting for your next post. Thanks once again. Hvac Contractors Insurance Texas
ReplyDelete"Great article! You always have a way of making complex topics easy to understand.
ReplyDeleteAdobe Express
Fortnite"
Thanks for sharing it but people who are using non genuine, cracked or pirated operating system, Mostly facing problems and after the bogus updates their issues may become complex. I also used windows 11 pro trail with many issues on weekly basis but when I activated it there's no more issue found. To fix it, I purchased license key from odosta store which I think is a Microsoft product reseller.
ReplyDeleteThis comment has been removed by the author.
ReplyDeleteNorthampton Transport delivers trusted house removals northampton services for a smooth and stress-free moving experience. Our experienced team manages packing, loading, transport, and unloading with care and precision. Whether moving locally or long distance, we provide reliable, affordable solutions tailored to your needs, ensuring your belongings arrive safely every time.
ReplyDeleteNeed a reliable moving van york? My House Removals Ltd offers professional, efficient, and affordable van hire with experienced staff for home or office moves. We handle packing, loading, and transportation to ensure a smooth, stress-free relocation. Book your moving van in York today for hassle-free service.
ReplyDelete