In this two-part blog I explain a simple way to convert van into a comfortable camper for $200.

Since I started the first part in 2011, more than 600,000 readers have checked it out.  It inspired many to build their own campers. Some sent photos which I added. It's a good way to share information.
In Part One, I explained in simple terms how I designed my '04 Toyota Sienna van conversion..
In Part Two I go into greater detail to showing you step-by-step, how I am turning our 2012 Sienna into a home on the road.


Glenn Terry ("The Grove Guy") Gainesville, Florida,
Our latest van (above) June, 2018
___________________________________________________

The 2004 that we enjoyed for 7 years, June, 2011
______________________________________________________
PART TWO- FROM A VAN TO "HOME"
My wife and I loved our old VW camper but the darn thing kept breaking down. In 2011 we replaced it with a 2004 Toyota Sienna van. At first it looked like the dozens you see on the road. Then, we tossed the back seats and replaced them with a simple bed frame.

After that, we hit the road and and enjoyed traveling in "Goldie" for seven years. Two trips took us over 11,000 miles. The van was a comfortable, reliable vehicle but as she aged we thought it might be better to trade her in for a newer one. Also, I love working with wood and looked forward to another creative project.
Goldie found a new owner and we bought a low-millage 2012 Sienna to replace her. Above, you see me putting the bed frame inside out first

Here I am, seven years later, doing the same thing with our latest van. Over time we've been so happy with the original design we are barely changing it.
You can use this information to convert any van into a camper. I know Siennas so I'll stick with them. My first one was a part of the 2003-2010 series. The latest one is a part of the 20011-2018 group. There are subtle differences. I'll point them out as we move along.
WHO NEEDS SEATS?
Turning your van into a camper starts with getting rid of the back seats and their seat belts Some just fold them away but my version will forever be a two-passenger, one dog, camper.
When it came time to sell the first van, it sold for about $1000 more than the same van as a non-camper (with seats).
Goodbye Dollies
To my surprise, unlike the earlier Siennas, when I removed the middle seats, large, black, "dollies" remained. They were ugly and stuck up 2" above the floor. I could have left them, moving them to the back of their tracks so they would always be under the bed.
I did not want them and learned they are very difficult to remove.You need a mechanic working under the van for 3 hours to get rid them. It cost $270 and for me it was money well spent. Painters start with a white canvas, I wanted to begin with a flat floor. Note: I put Gorilla Tape over the resulting floor slots. a throw rug will later cover the whole floor.
Below, before dolly removal. The dollys in their tracks are on the floor behind the front seats. You don't have this problem with pre-'11 Siennas and with most other vans. With most you can easily make the floor "flat". Still, most minivans don't have level floors. I'll get into that next.

Now, it was time to start building the bed frame. Ideally, you want to park your van on level ground so the bed inside will be level as well.
GETTING LEVEL
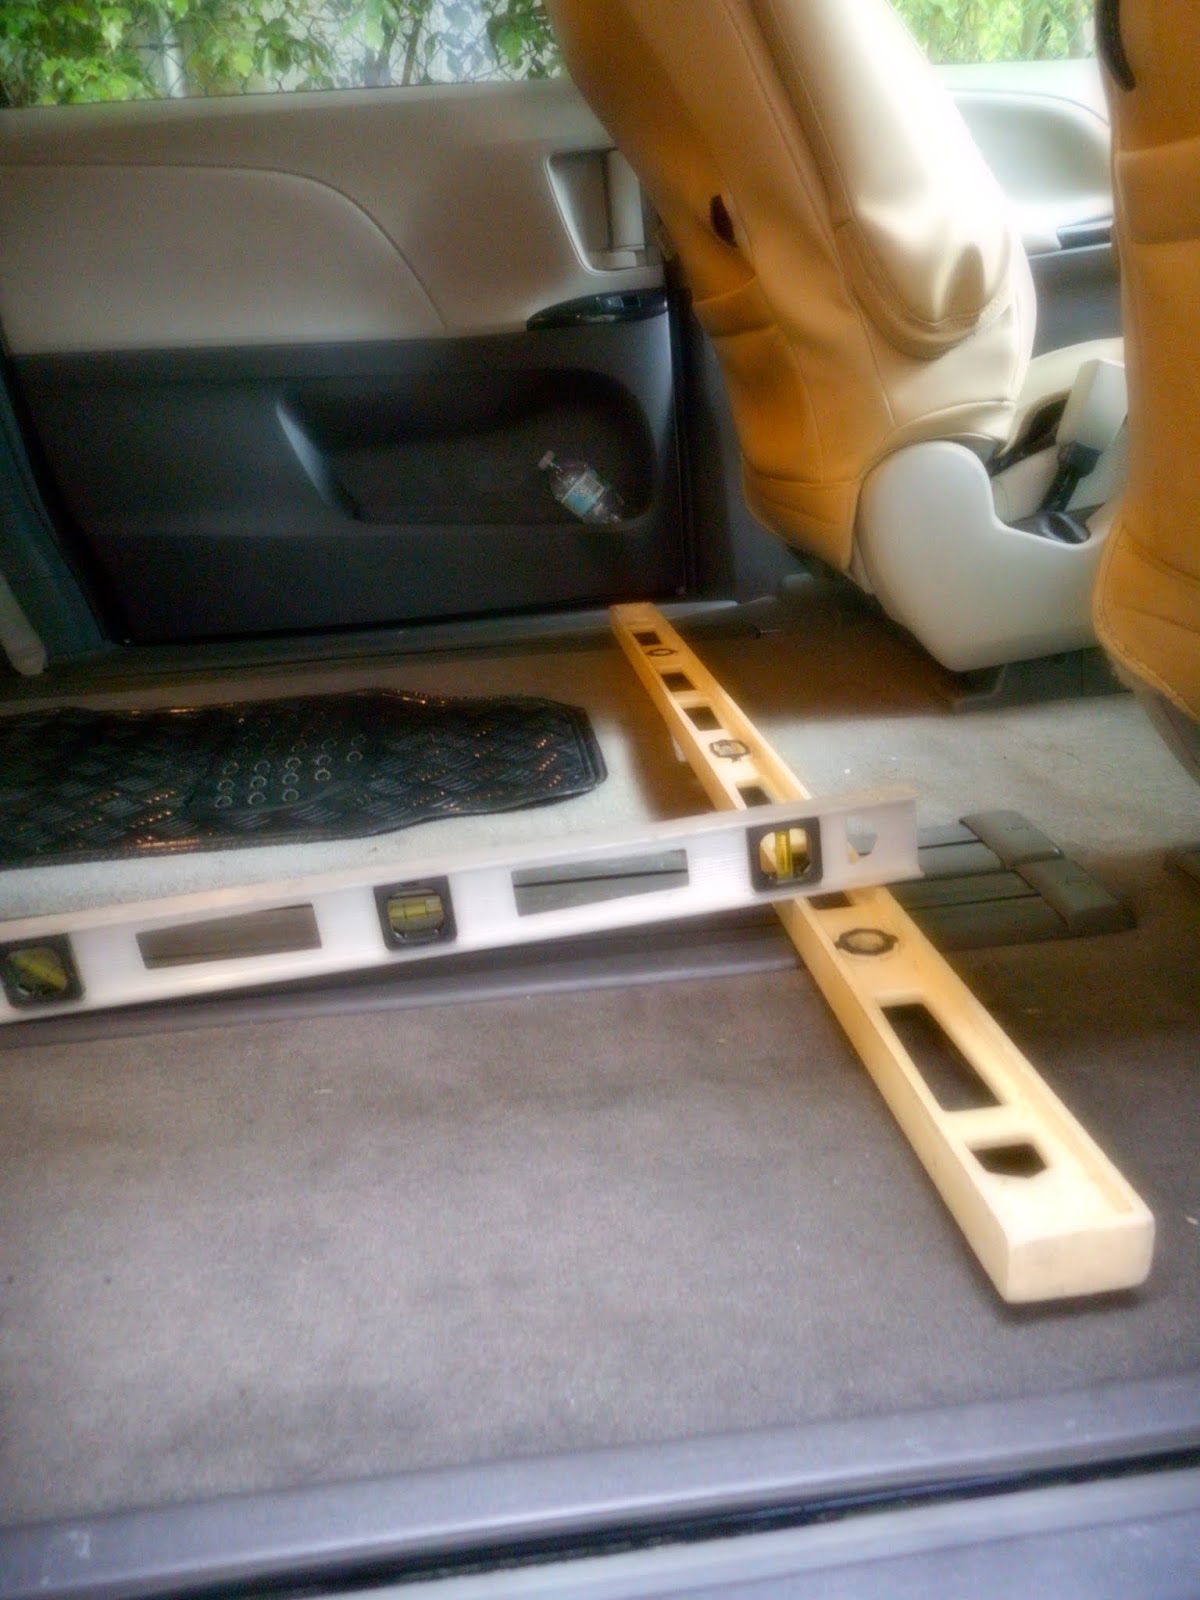 As you see to the left, my van's floor, in just two feet (it's a 2' level) goes down an inch.
I then backed my new van onto two ramps until my dear wife told me I had reached a point where
the van was as level as it had been on the level street.
 You do all this so your van's bed can be level as the one in your bedroom.
Level in my driveway
BUILDING THE BED
If you read the blog that I wrote seven years ago you know I came up with a design similar to that of a VW camper. It is a double-bed that converts into a little couch. The frame is made of 2x2" pine and is topped with 1/2 " plywood.
I am making this one as wide as I can (50") for a Sienna. It is wider than the 45" previous one as my wife requested it.
If mama's happy, everyone's happy. Francesca likes to "spread out". I am twice as large as her but she takes up twice the bed space. Strange but it all works out. Mama's happy.
The bed is a long as I am, 6'1.5". It will have three cushions which will total 50" x 73.5" x 4".
 Here's a photo of the frame half completed,
When you set it in the van on buckets and blocks -so it is where you want it to be and, level- it looks like this,

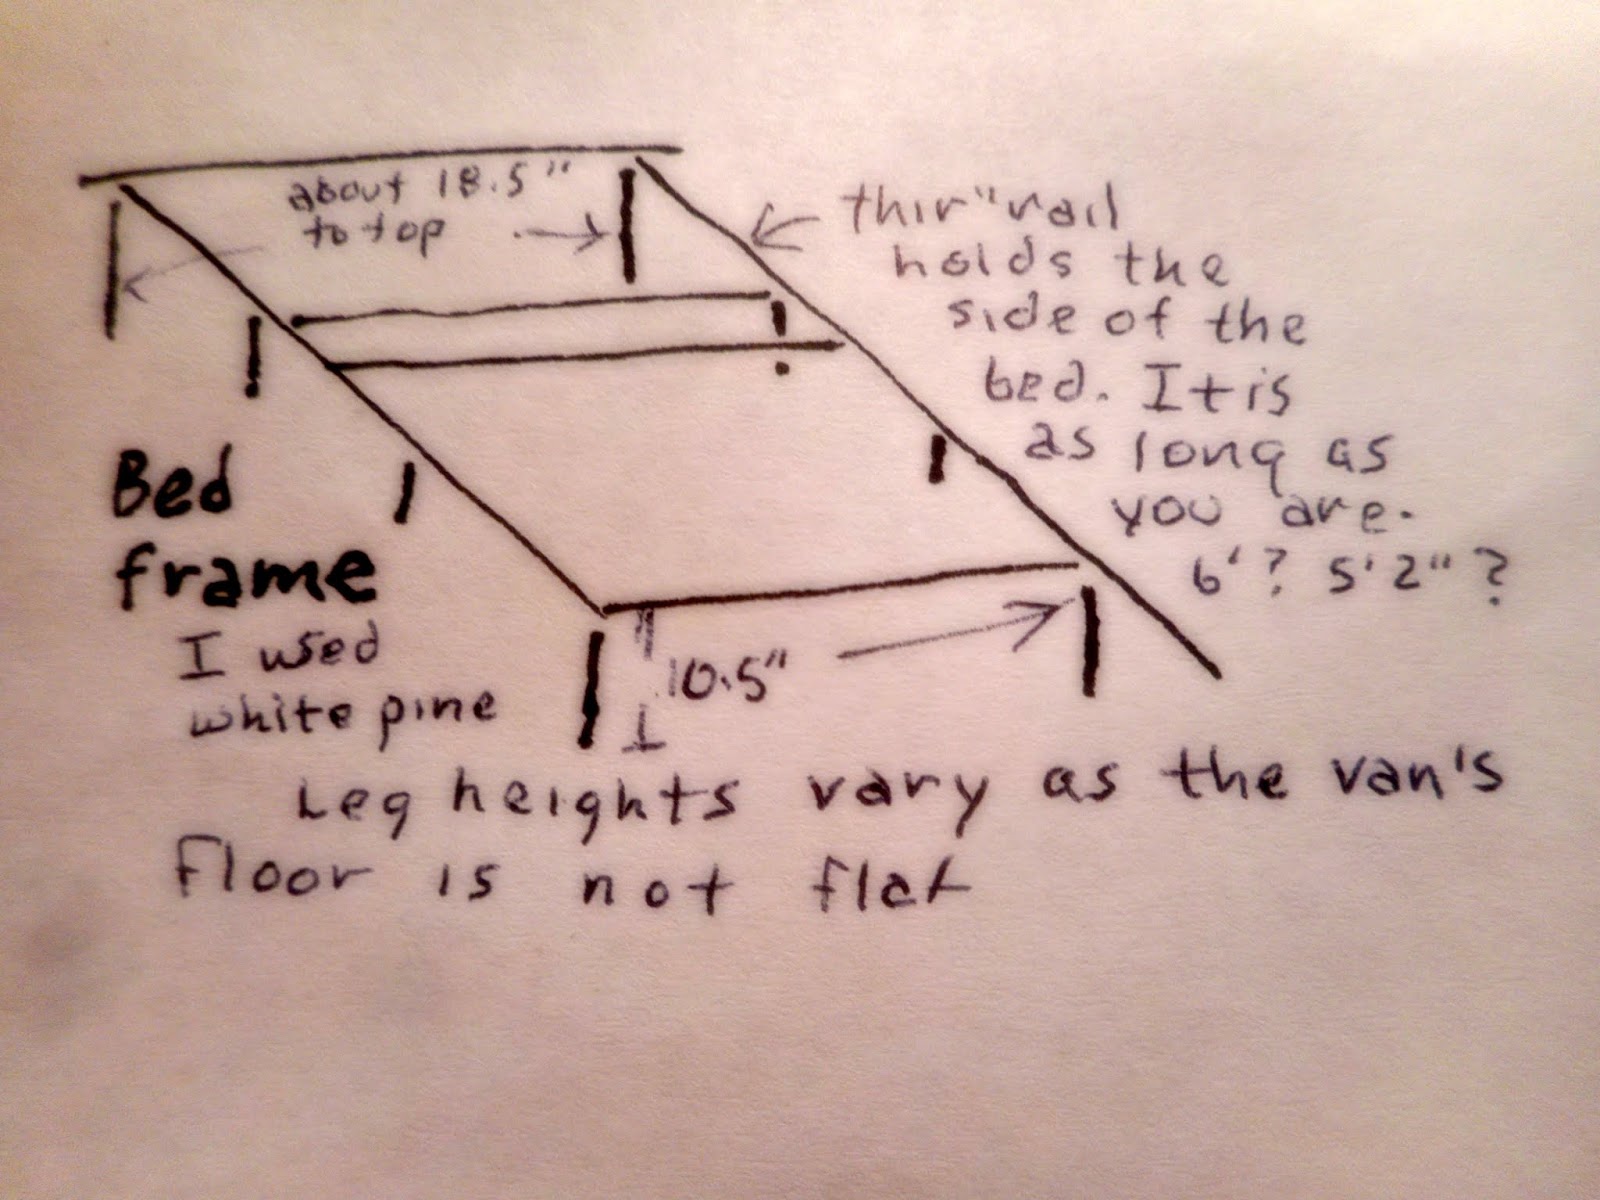
This drawing might explain it a little more,

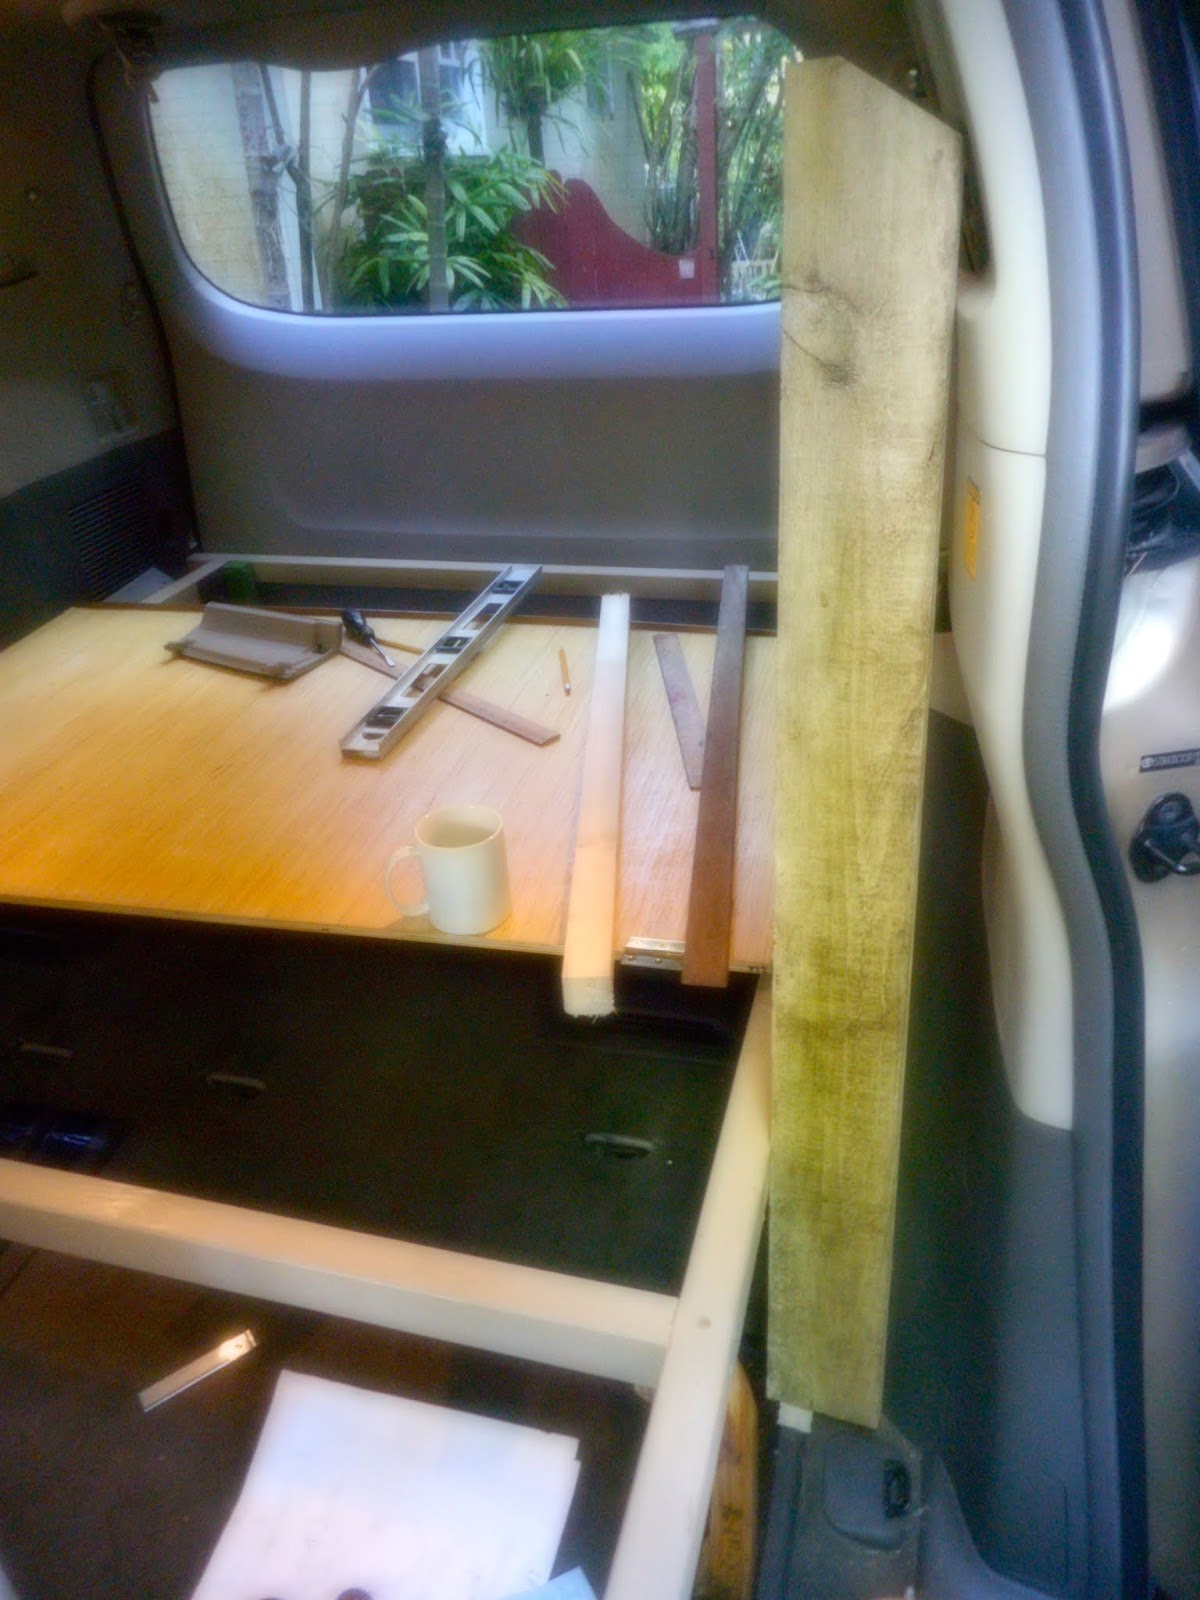
I got the frame level in the van (using a "le
 vel") by setting it on buckets, boards, shims and, a flower pot.
 When it is where you want it to be you can measure from the bottom of the frame to the van floor to see how long each leg should be.
 My bed is frame 10.5" off the floor (in the front). With the plywood on top it'll be 11" and with the cushions, about 15" above the floor. In the back the legs are 18.5" long. They go down in the "basement" floor. (photo above, measuring for the legs in the back)
After I wrote my van conversion story in 2011, I started getting e-mail from people asking many questions (I am at bettermiami1@yahoo.com) . This time around I am going to explain the process much more than I did before. For instance, here are more bed frame drawings that might be helpful,

You put four 1/2" plywood pieces on top of the pine frame. The top two are hinged so they can move back and form the couch. The bottom one is hinged and attached to the skinny piece so you can lift it up and stare admiringly into the "basement".
The skinny 5" one is the only segment permanently attached. This helps to hold it all together.

When you put the frame on top of your ping pong table and set the raw plywood pieces where they'll end up, it'll look like this,

BUT WHAT IF I WANT SOMETHING SIMPLE?
Some of you may be happy with an elevated double bed platform that lifts up on each end, one that does not convert into a seat, one that does not
have side shelving. If so, here's a drawing for you.

The design I prefer converts and has convenient side shelves so I'll continue.
COMPLETING THE BED BOTTOM PANELS
I painted both sides of the four panels with polyurethane first (three coats). Measure everything twice (and cut once) to make the support 2x2's that go underneath.
FROM A BED TO A COUCH
Here's where it gets interesting. You need to figure out how to flip up and slide back the front of the bed floor to form a couch. On the bottom you add wood to hold the sliding pieces in place (in each position) and, a folding leg.

 FOLDED This is a good example of working harder than I need to. A simple, hinged 2x2 (or 2x3) butted against the pink retainer bar would have worked fine. I chose to get crazy with my band saw to add the curves and notch. The curves kept the magnetic catch from touching the metal plate on the plywood so I had to add a block to raise the plate.
 It's an artist's dilemma which I enjoy.
UNFOLDED
The pink 2x2 does two things. It gives this piece (the seat of the couch) necessary strength when it extends to be the front of the bed, and, it keeps this part from moving forward when it is a couch. 2 1/2" beyond it is the front edge of the bed. I put a 1/4" x1" hardwood strip on the end to a) keep the plywood from slipping back and to keep the mattress from coming off the bed. It sticks out quarter inch above and below.
 This is a detail from a painting by Michelangelo. It also shows you where another "strength bar," like the pink one noted above, goes to give the 1/2" plywood necessary support. I suppose you could use thicker plywood and need less support but I prefer to build "light". This is the "yellow bar". You see it in the photo below.
Explanation: The brown bar (#1) gives the couch back (the 17" piece) strength. It also connects to the struts (wood or metal) that hold the back piece when it is "up".
 The yellow bar (#2) is set halfway on the couch bottom. It is then glued and screwed only on
 the bottom, 21"plywood piece.
The two little yellow blocks, #3 and the identical one below, keep the 21" piece in position when it
is in bed mode. Then it is resting against the forward frame piece.
#4 is the folding leg, only used in bed position.
#5 keeps the the 21" piece from moving forward when it is in couch position when, it also rests against the forward bed frame 2x2.
Everything is painted with exciting color because seeing them makes you smile.
I invented a Miami parade 37 years ago called the King Mango Strut. It still takes to the street every December.

So, it's always a thrill to get to use the word "strut" as I now show you how to make one.
MAKING THE STRUTS
 It's time to make the two supports that hold up the back of the couch. I used 3/8" hard wood the first time. Now I am going with steel. I bought two pieces of flat steel stock at a metal shop for five bucks, 20" long. You can have them drill the holes (1/4" top, 3/8" below) or do it yourself. I shaped them a bit so they'd look cool, like twin machetes. Having an angle at the top is important too.
Being an artist, I add curves when I can.
I then set up my couch on the frame using a
 stool ladder to hold it up at the proper angle. I found the plywood coming back 6" from vertical felt good ( yes, I tried it out first).
I then drilled the holes top and bottom to attach the struts. They are permanently attached to the outside of the frame.

 As the struts move from one position to the other they are attached at the top with 1/4" bolts and held in place with 1/8" bungee cord. I suppose thick rubber bands would work too. Chewing gum is too
 messy.
As you see above, I cut up an old butter knife blade. I glued a piece on each side so the metal struts would not think about digging into the
wooden couch.

 Glenn's miraculous attachment system
 Building the bed to maximum width can be challenging. When I set the bed frame back in van with the struts bolted in place I only had 1/8" clearance.
That's okay, I planned it that way. I added felt pieces to the bolt heads so they would be snug with the van walls.

Back Bed Frame Legs
 I took the frame in and out of the van quite a bit during the building process. It's much easier to work on out of the van, on a large table or saw horses. It had the two front short legs already. When it was time to install it permanently I attached the middle and rear legs.
CABINET TIME
 Now that the bed is complete you can add some shelving next to it. I started by adding the leg at the end of the bed frame.
 This sets the height for the top shelf.
When I needed a shelf or vertical support that I wanted to fit into the van's curving sides, I made
 template. I did this by starting with a straight board that fit into the space.
  I then added cardboard pieces to fill in the remaining space. Next I traced the resulting shape onto the board I wanted to use.
Then I had something that really fit into the van's curvy interior. Note: You can do all this with straight boards as well.
 I added mango cut outs to make this piece more whimsical.
Here's what it looks like with the shelving completed,


You have to make sure the three pieces that lift up clear the shelves. I had to do a lot of "adjusting to make this happen. If I did this again I would have made the bed an inch more narrow to have more wiggle room for the shelves and the struts. The material costs at this point was about $120.
COMING UP WITH A MATTRESS
Now it was time create a comfortable bed. There are many ways to do this. For a permanent one you could use a futon, foam mattress, or an inflatable bed. As ours converts, we needed a three-part mattress.
You can have a upholsterer or a boat cushion company do this or make them yourself. We chose a combination of both.
A local mattress company cut the foam pieces (before they did, they let us lie down on our mattress-to-be first. It felt good!).
We asked them to cut it up so it measured
49"x22"x5", 49"x17"x5", and 49"x35"x5" .
We bought 6.5 yards of upholstery material at a fabric shop. We took this car full to,
Gina, our seamstress friend, who turned them into cushions in about three hours. Now, they sit proudly in our van, waiting for next week's cross country trip.
_______________
June 21, 2018
 It took a couple days to pack but the dog's on board and we're ready to roll.
We'll be heading up the coast to North Carolina today.
______________


Everything's goin' great. The van and the latest conversion are performing flawlessly.
 We were having dinner in an Oregon campground last week when a young man approached and said, "I know you! You write that blog about converting vans into campers". Recognized 4000 miles from home, I briefly felt like a rock star.
Andy Stephen, a mountain climbing guide based in Las Vegas, told me he used my blog to convert his Kia van. He and his girlfriend live in it four months out of the year. It's nice to be able to share what you know with others...and to hear from folks like Andy!
If you want attention mount Paul Bunyan and Babe (his blue ox) on your roof.

October 16, 2018
After four months and 14,000 miles on the road we made it back to Miami. It was a fantastic adventure where we explored the Canadian Rockies, the Pacific coast, Burning Man, then took the slow road home. The camper worked flawlessly. Many of those who wander are not lost.

Great stuff again Glenito
ReplyDeleteI am definitely doing this with my Sienna in a few years. I still need the back seats until the kids move out or are older. If I decide to do this in 2 stages, is there room to replace the 3rd row seat with the folding bed and keep the 2nd row seats?
ReplyDeleteThanks for posting and sharing your adventures.
I’d love to know if you’re ever coming through New Hampshire so we could see your van in person. You’d be welcome to stay in our driveway and join us for a meal!
ReplyDeleteYour blog is very inspiring and I really like your mini van conversion. Thank you. I am thinking of doing this in a few years when leaving the rat race early.
ReplyDeleteBy the way, did you build the popup table for this 2nd van? Can you share how it was build, set up and store?
Not exclusively is hound air travel better for your pooch if the canine is sound, however it's really the law. uk destinations
ReplyDeleteI like your post very much. It is very much useful for my research. I hope you to share more info about this. Keep posting!!
ReplyDeleteHouse Refurbishments in Clapham
This comment has been removed by the author.
ReplyDeleteIf you are looking for tiny homes for sale in the USA then your search ends here; Check out Tiny Topanga and discover the freedom and flexibility of living with our wide selection of tiny homes for sale. Our homes are designed to meet your needs and budget and are crafted with the highest quality materials.
ReplyDelete